DIY Shredded Paper Nest
When decorating for spring, I love to use nests in my decor. Today I’m sharing how to make DIY Shredded Paper Nests using paper lunch bags.
I’m sharing my nests as part of a week-long Spring Ideas Tour that I am hosting.
Today on the tour we are sharing spring DIY and craft ideas.
Be sure to check out the other projects shared today at the end of this post and don’t miss the mantels shared on Monday and tablescapes on Tuesday. Come back Thursday for recipes and Friday for porches and decks.
Shredded Paper Nests
Back in 2011 Country Living magazine had an article on making shredded paper nests and I made a few and even blogged about it.
My results in 2011 were good, but not good enough that I saved the nest for more than a year or two. I never forgot that project and decided to tackle it again this year.
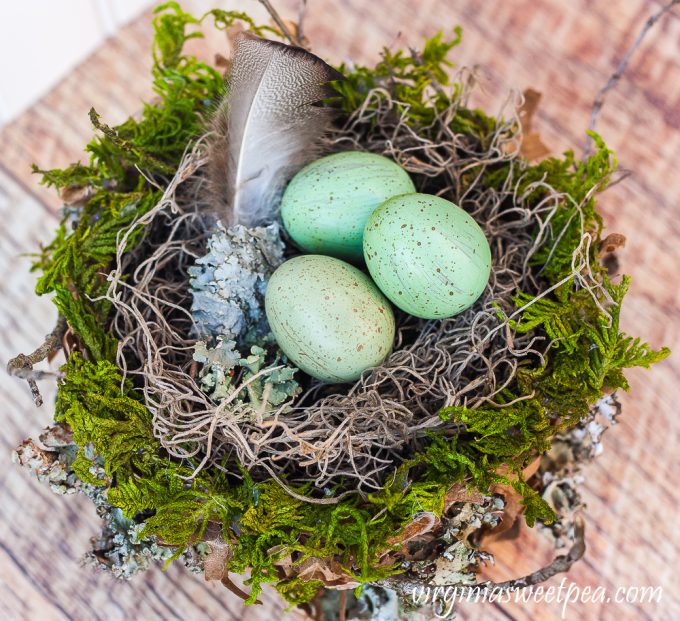
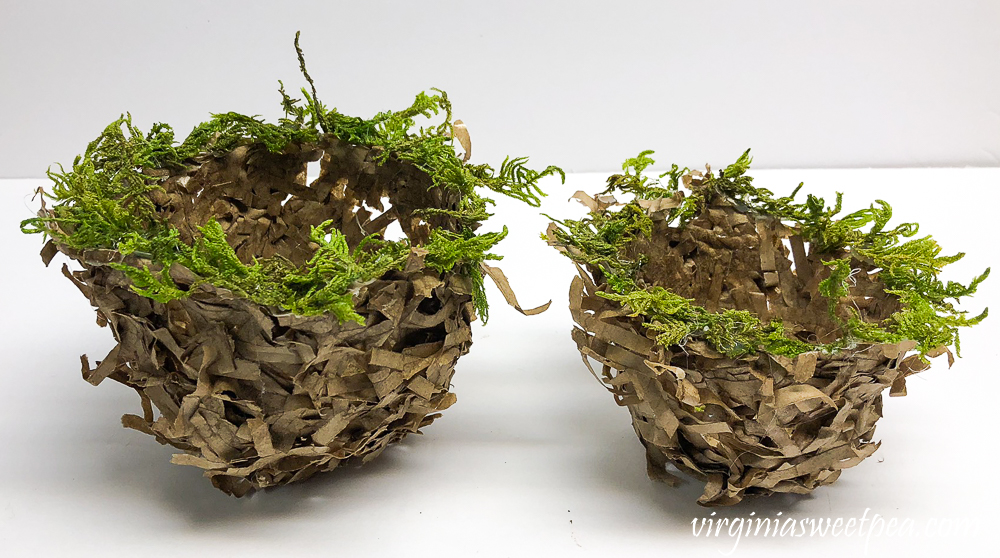
This time around I made two nests, one large and one small and I love the end result.
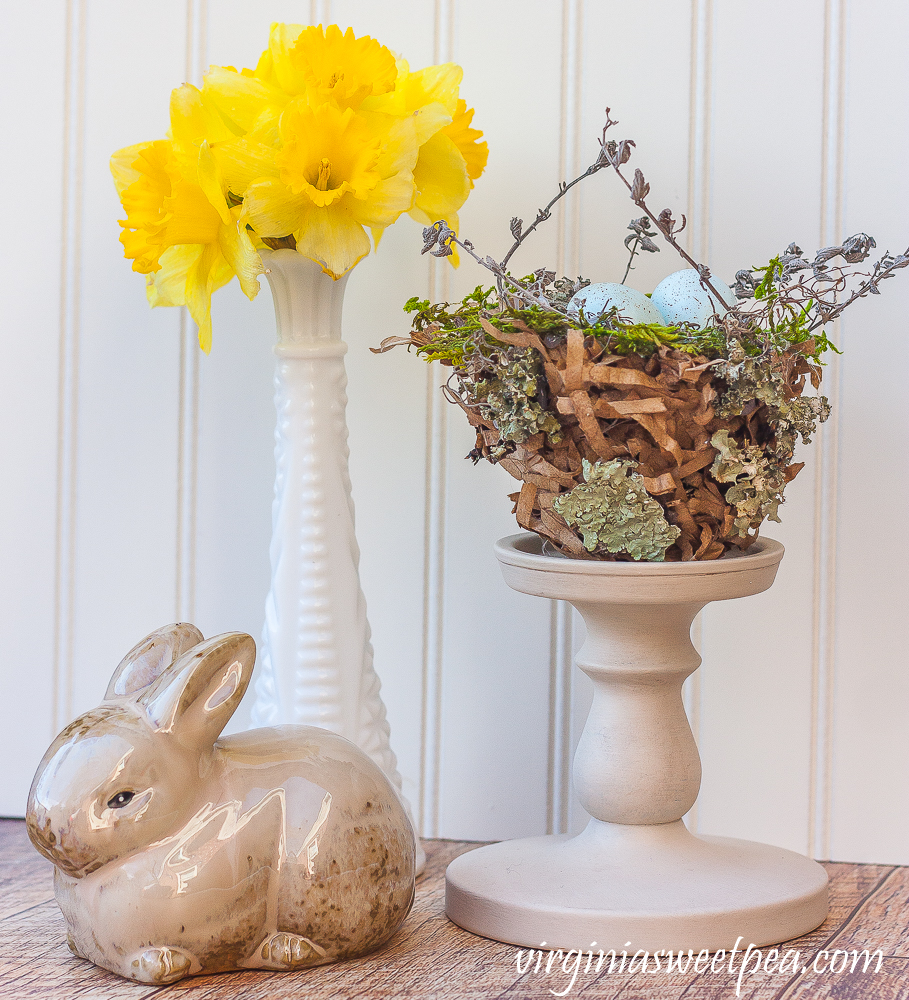
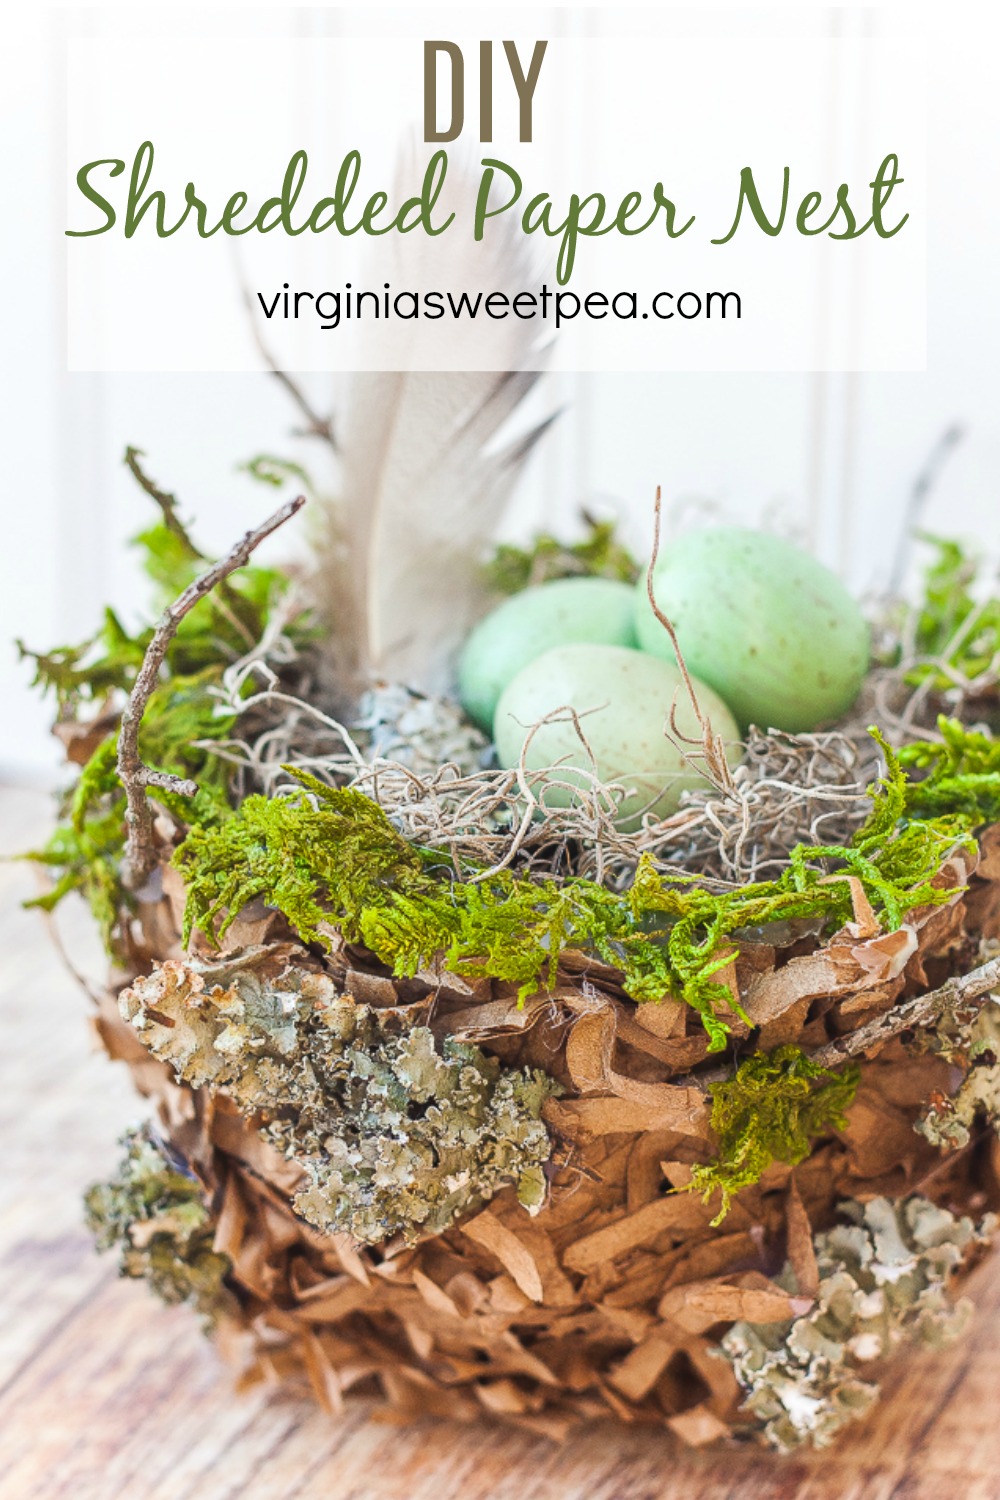
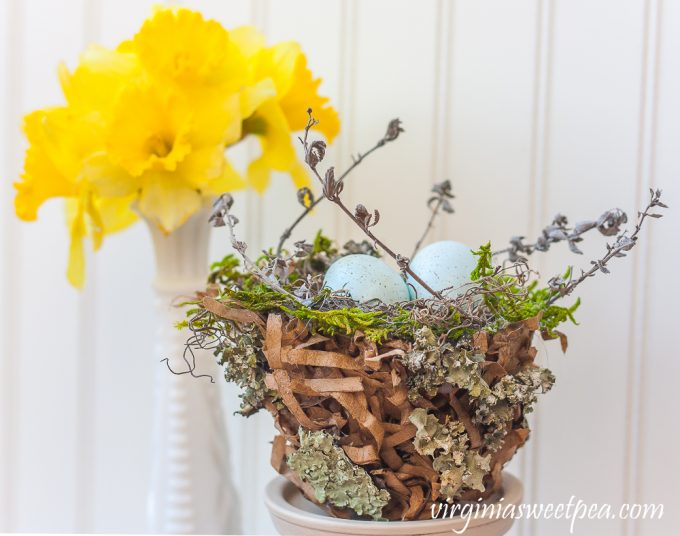
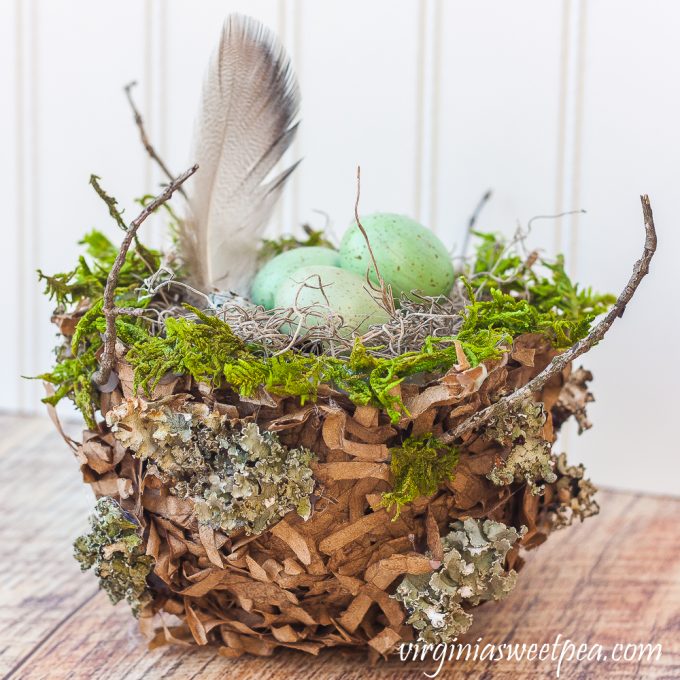
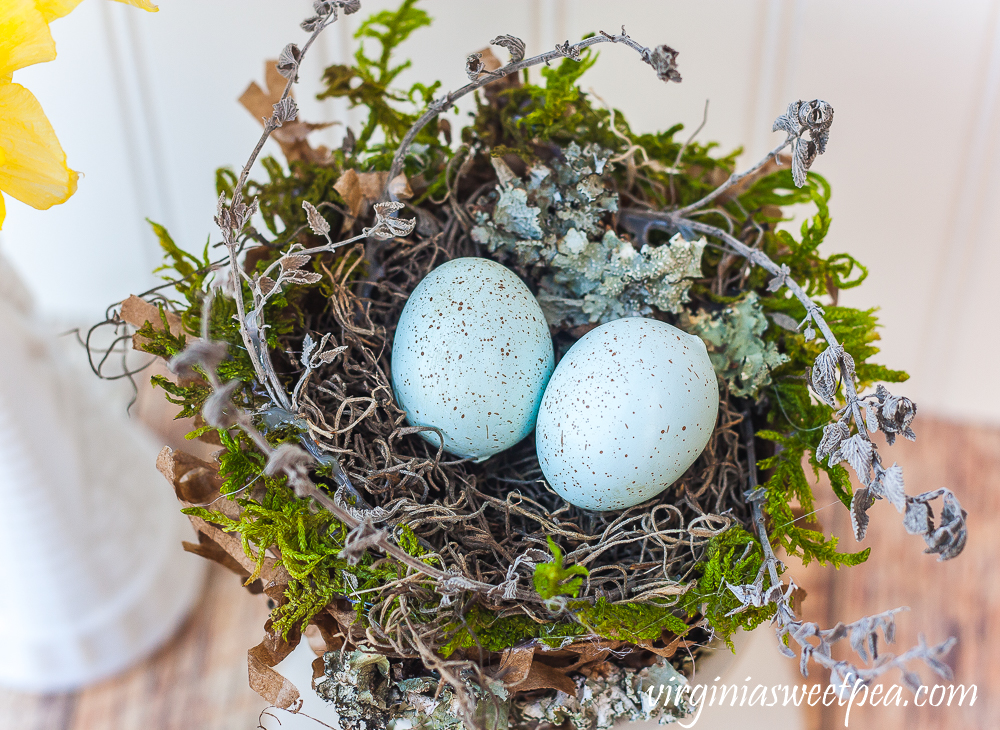
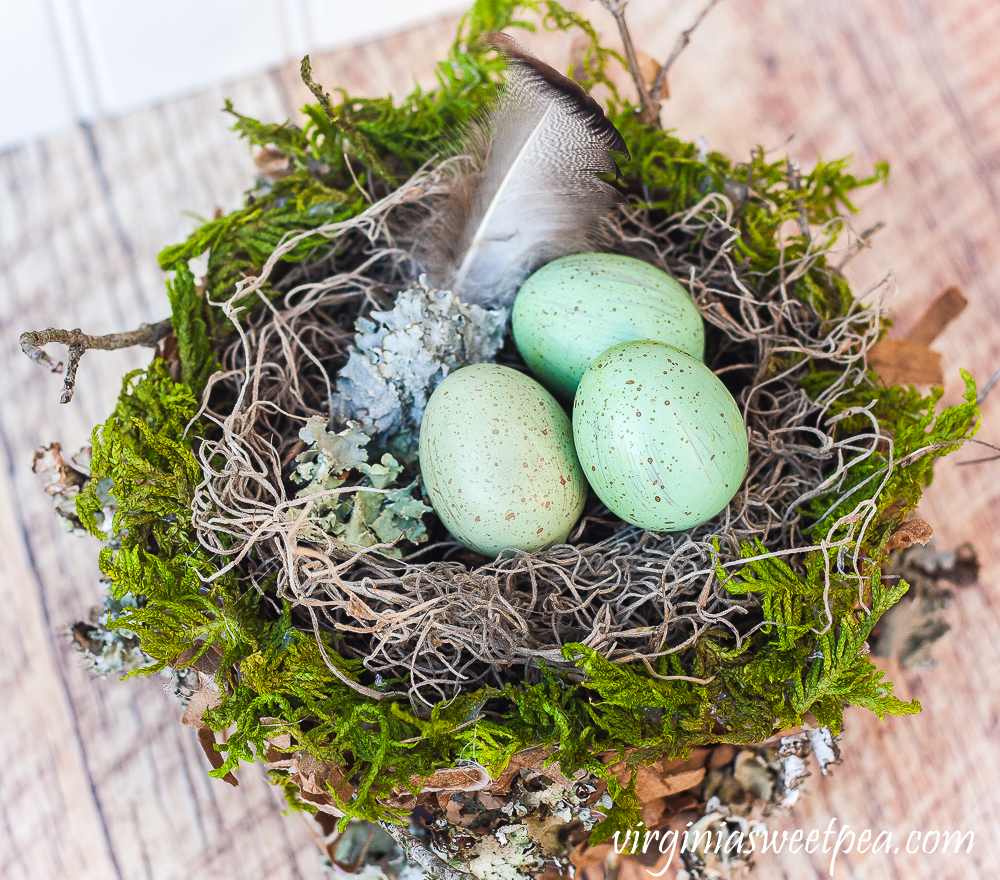
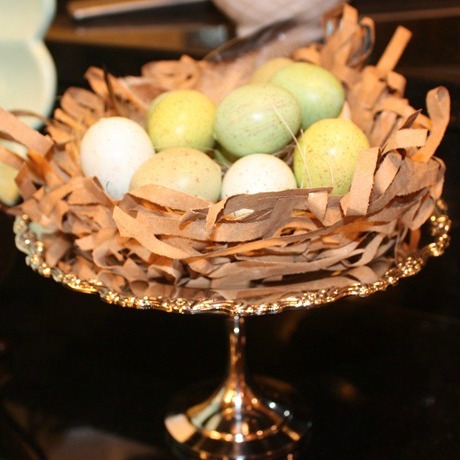
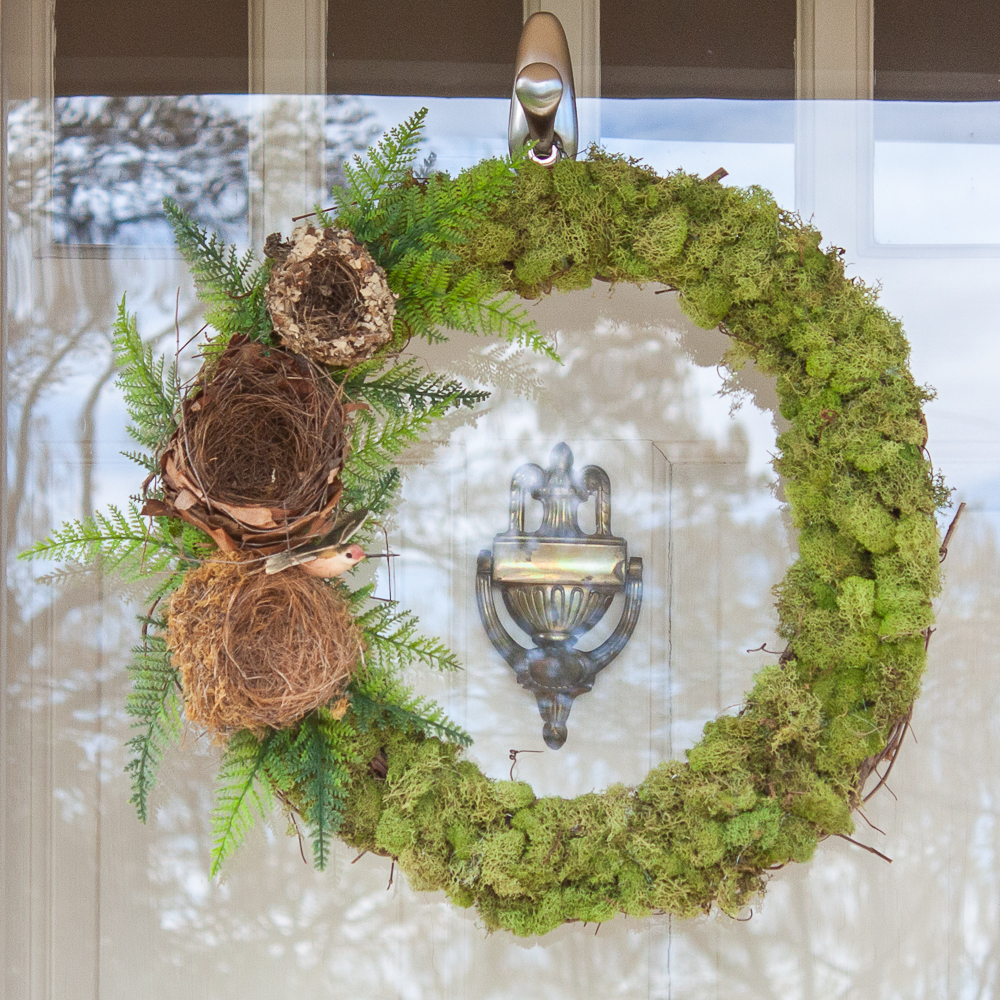
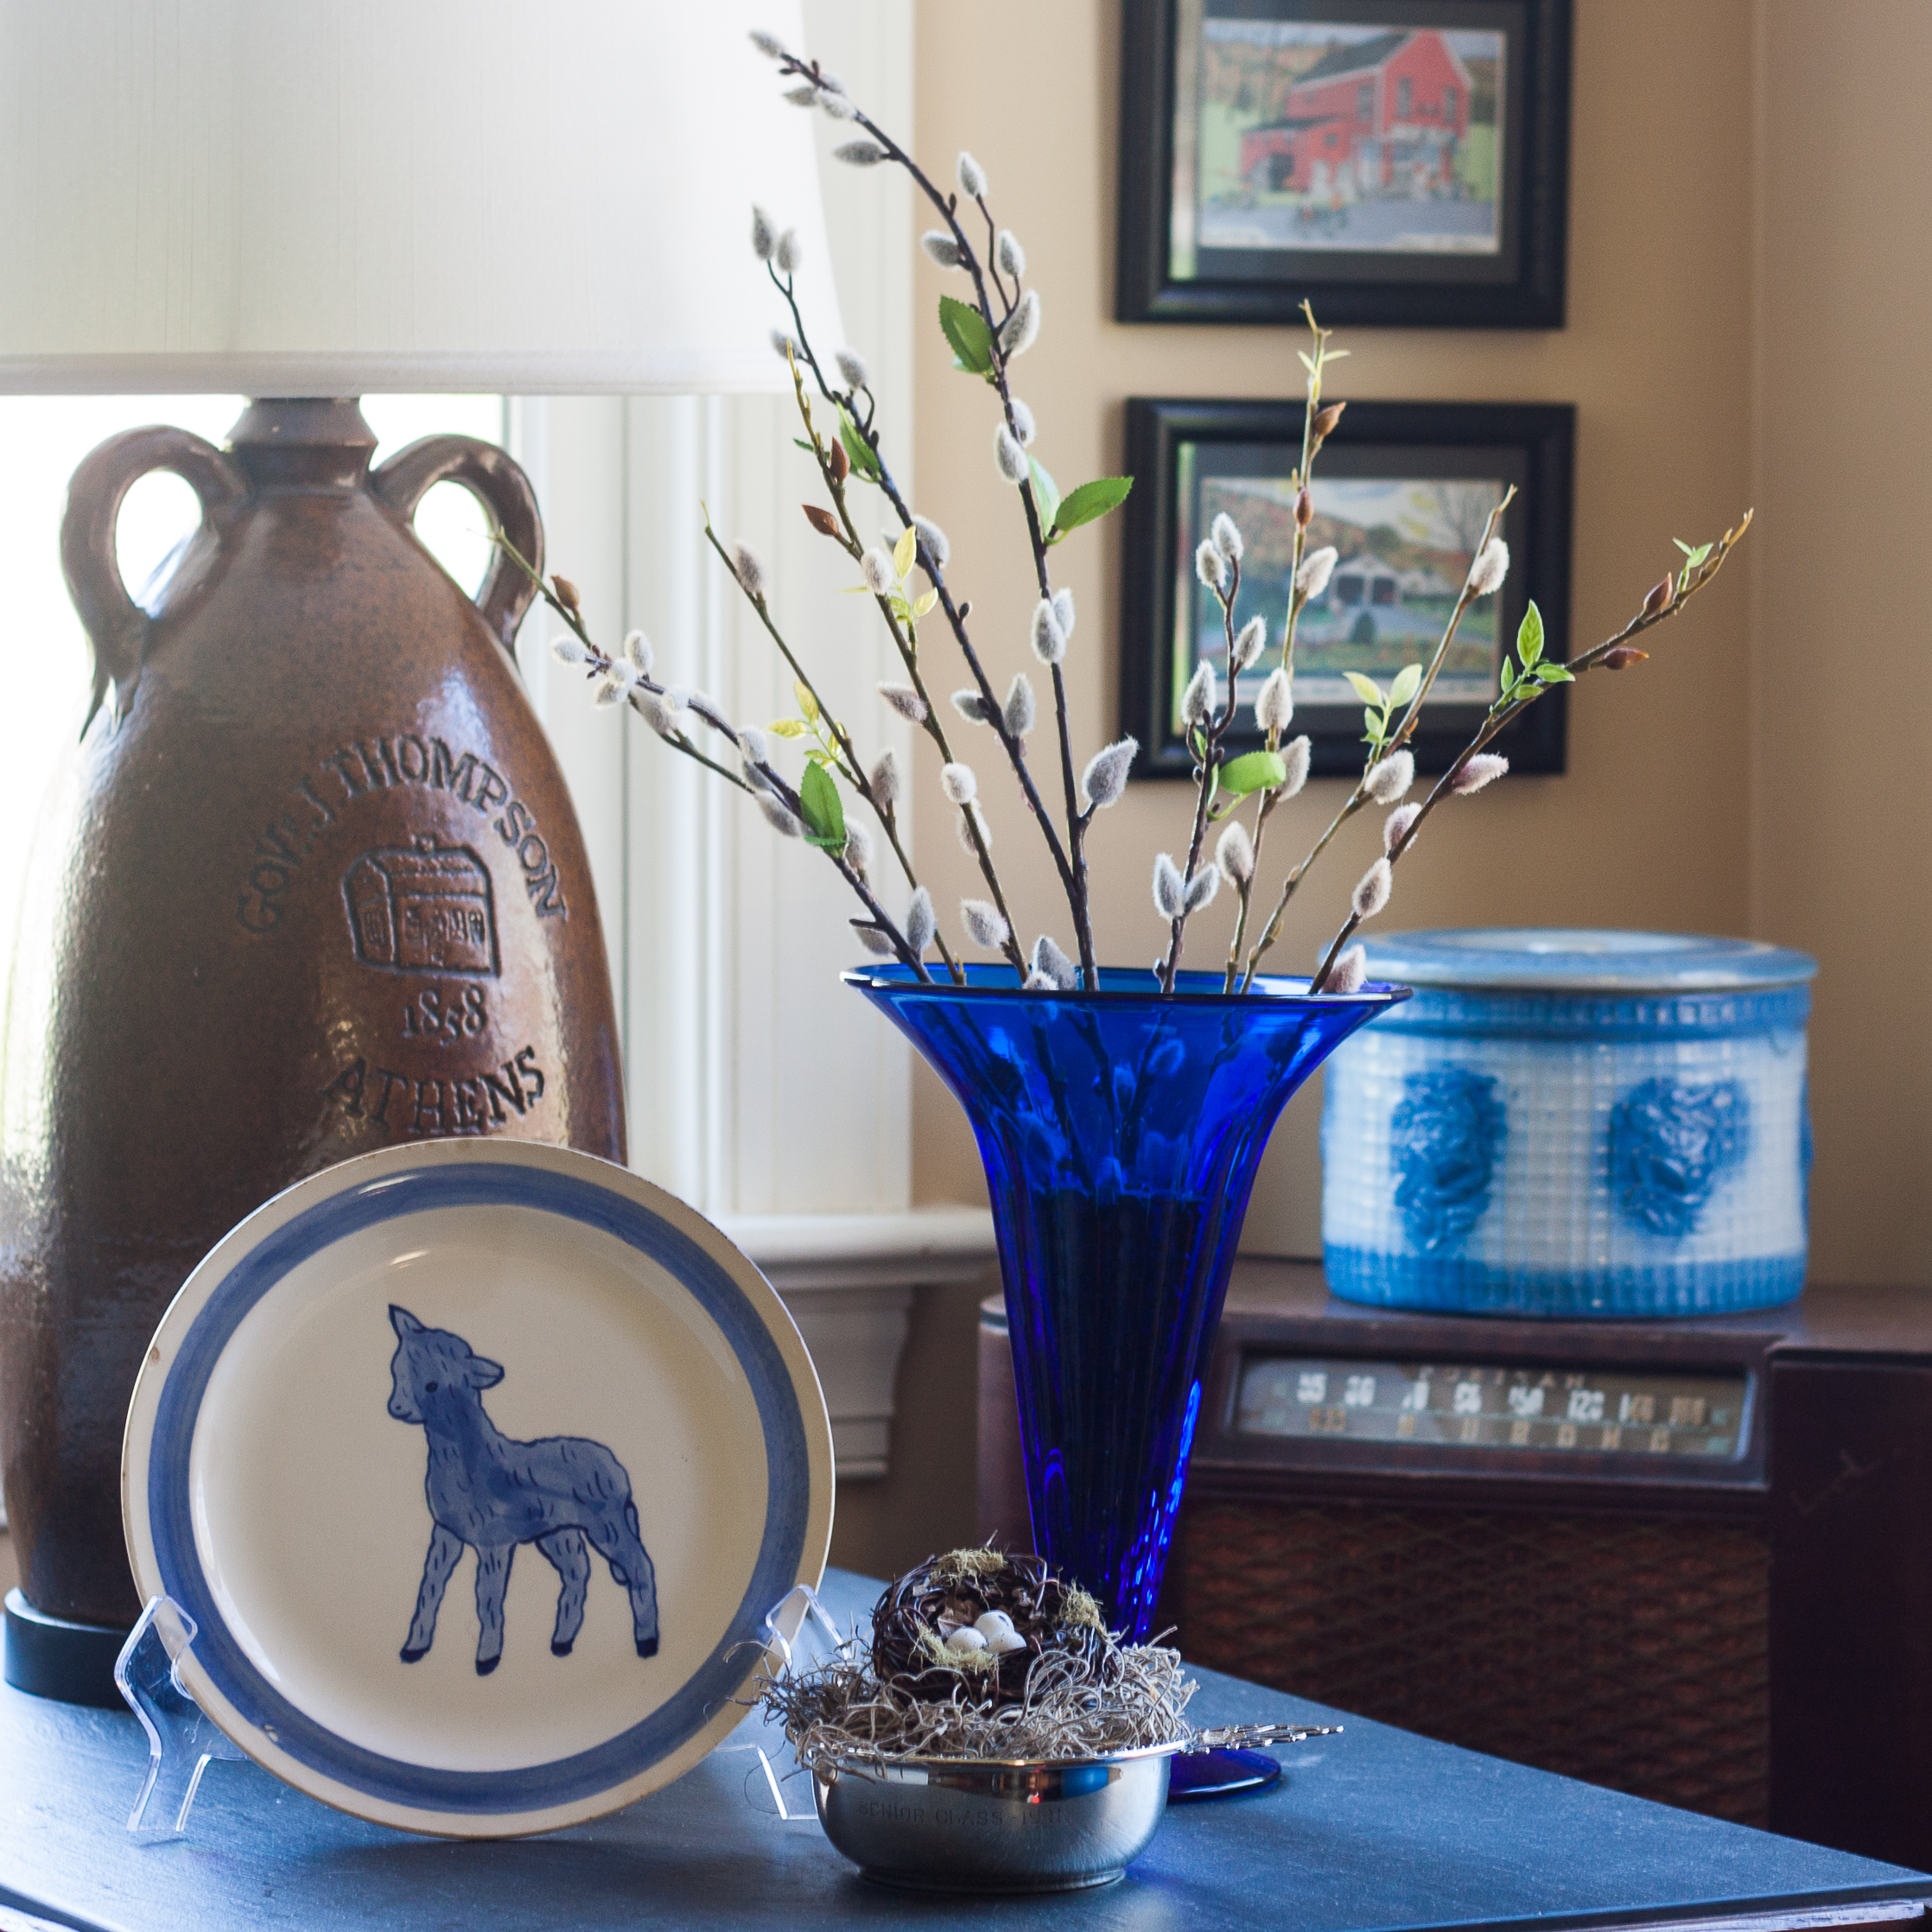
This is the small nest.
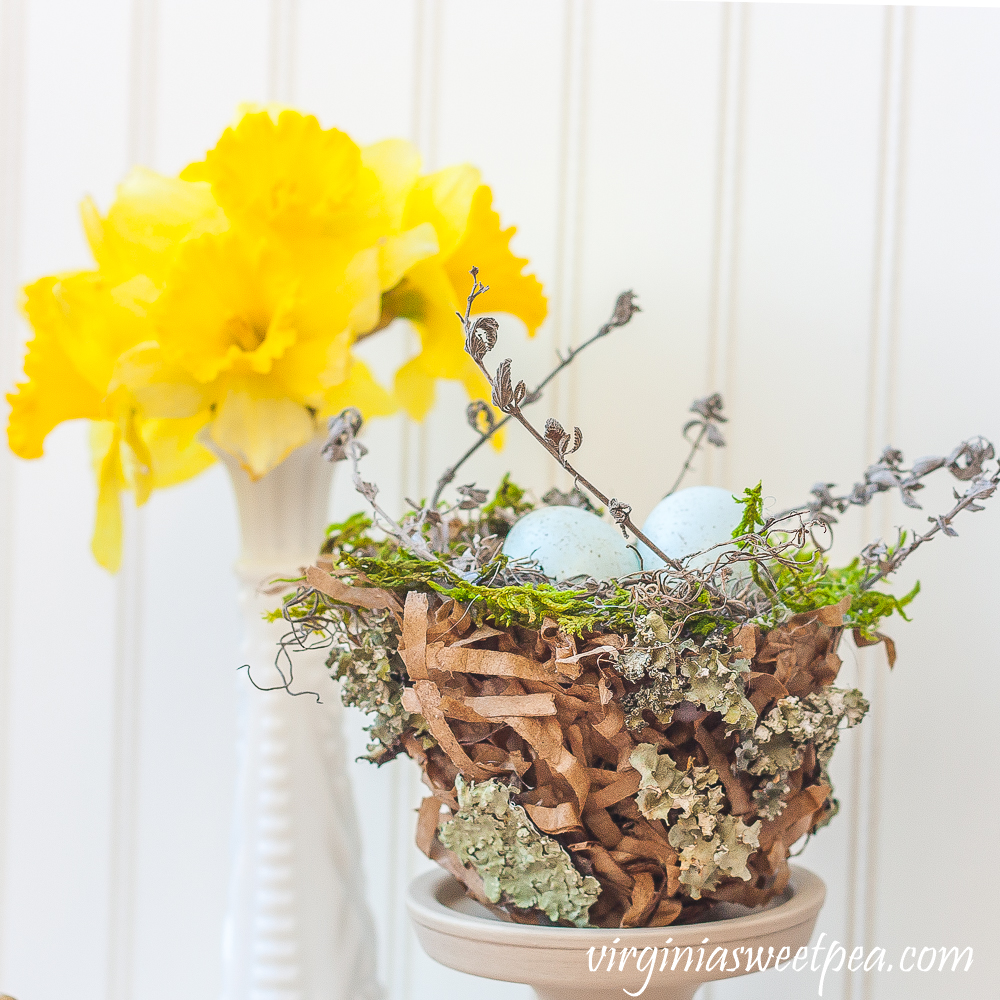
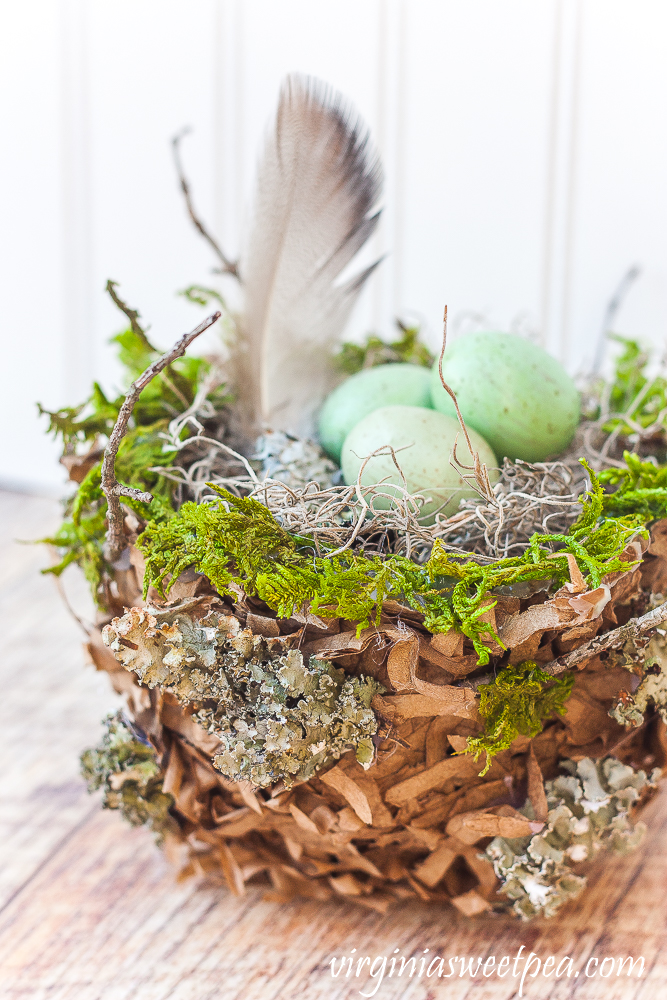
And this is the larger nest.
The nests were made using shredded paper lunch bags and watered down school glue.
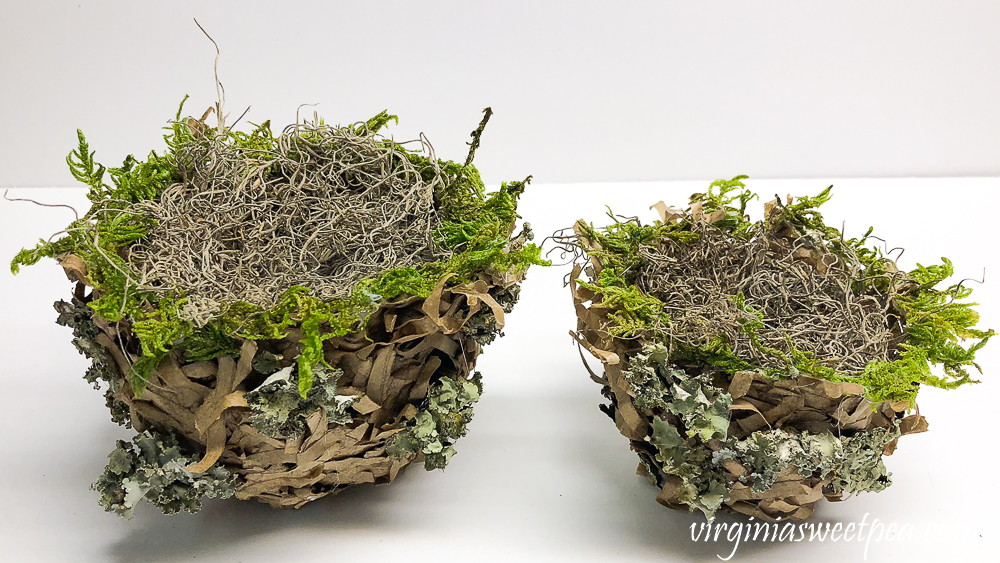
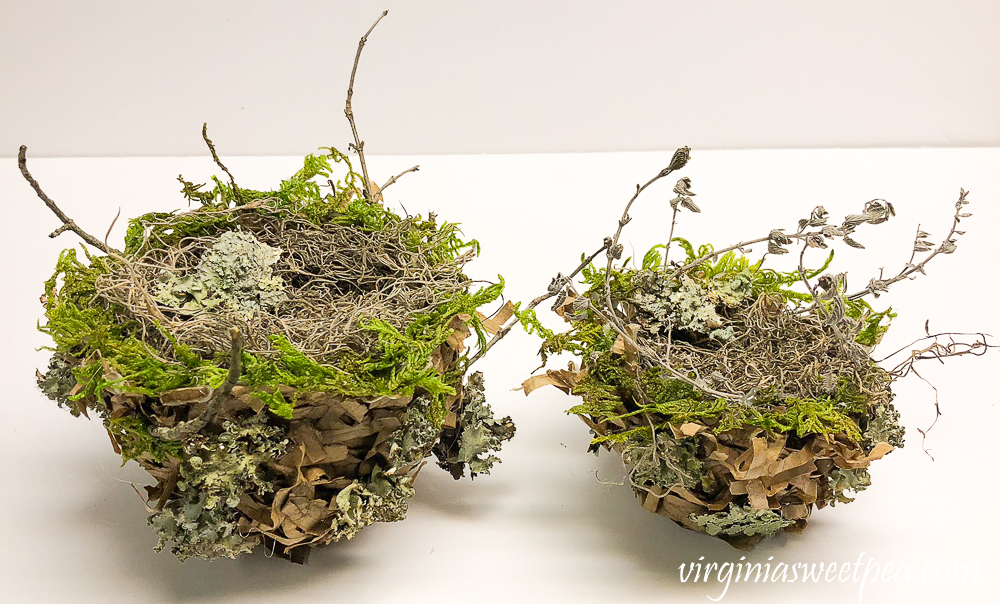
To make them look realistic, I filled them with spagnum moss, and used my hot glue gun to add dried green moss, lichen, and stems and twigs from my yard.
The smaller nest was embellished with dried stems from Catmint that grows in my front yard. The lichen was picked up on a trail in the woods while walking our dog.
The larger nest was holds a feather in addition to green eggs and lichen.
Both of these nests are currently being used as part of the spring decor on my porch. You can see how they look out there here.
How to Make a Shredded Paper Nest
Let’s learn how to make a shredded paper nest! A great thing about this project is you need very few supplies to make it.
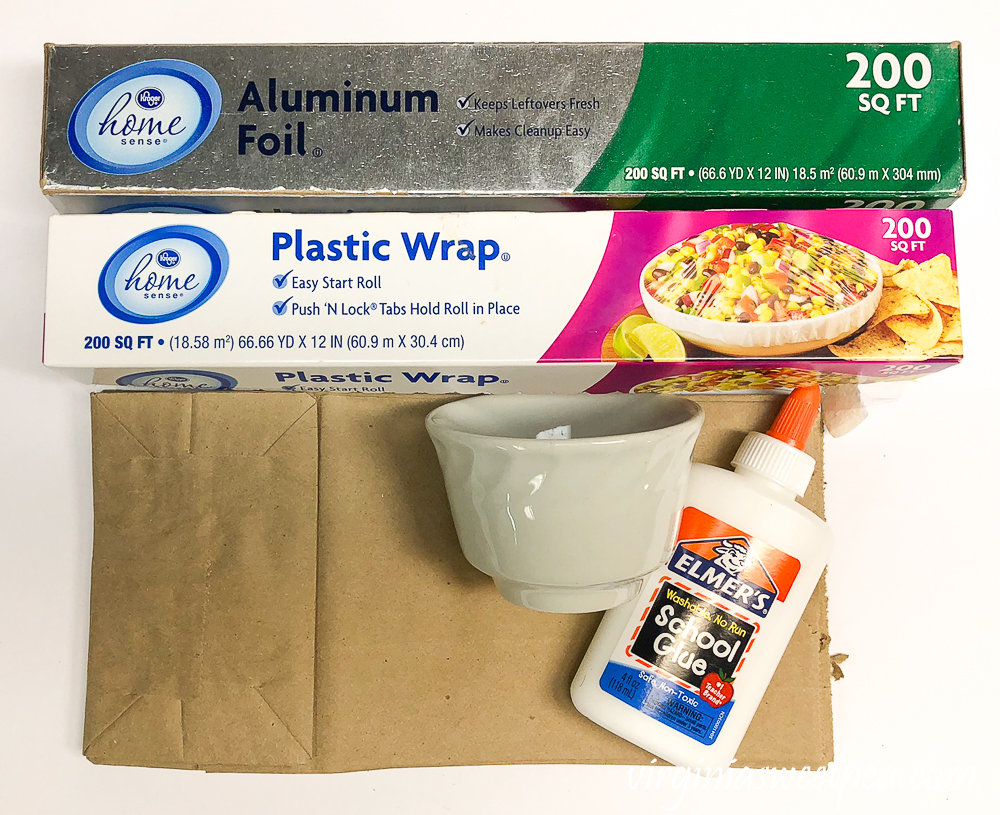
Materials
- Paper lunch bags
- 1 -2 bottles of school glue (Craft glue or Mod Podge would also work.)
- Bowls
- Plastic wrap
- Waxed paper – I used aluminum foil when I made my nests but realized later that waxed paper would have been a better choice.
Instructions
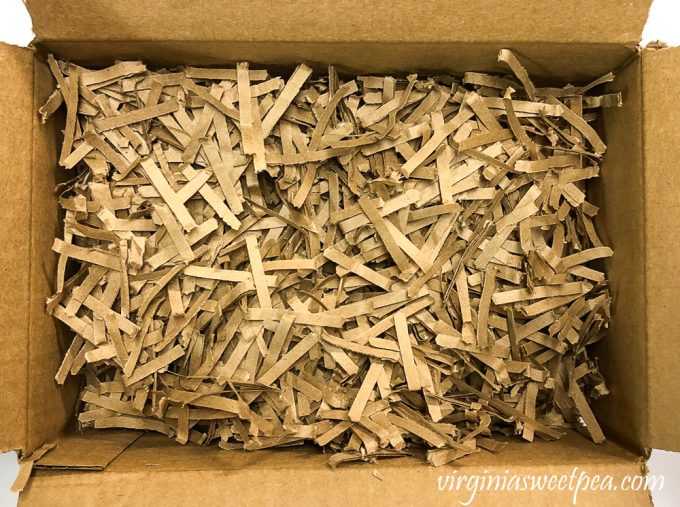
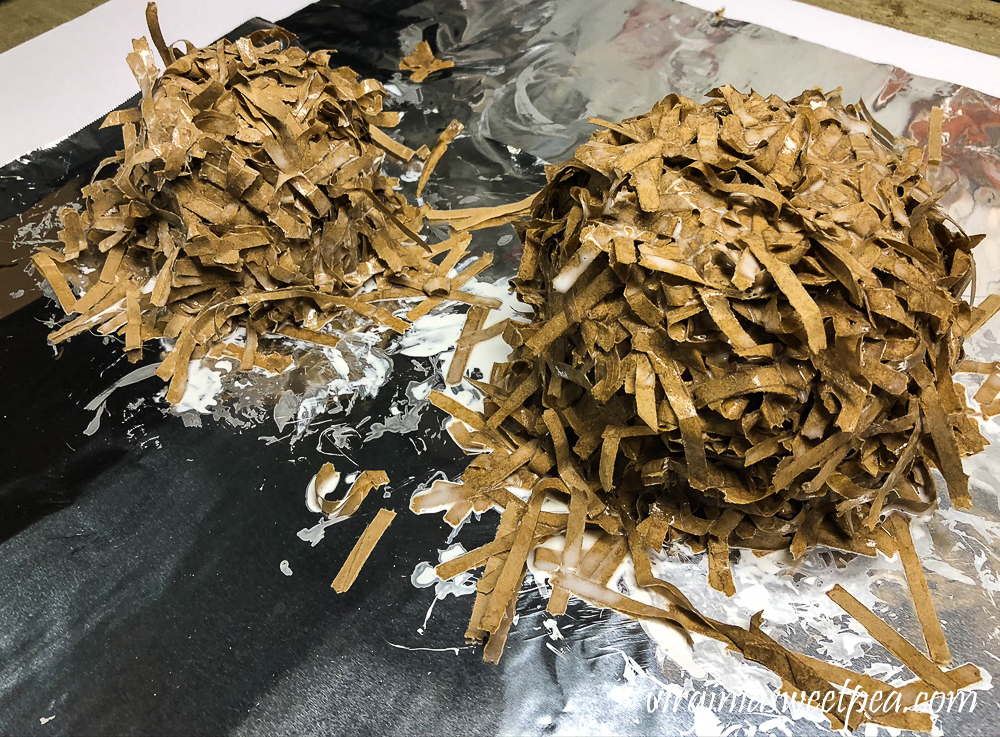
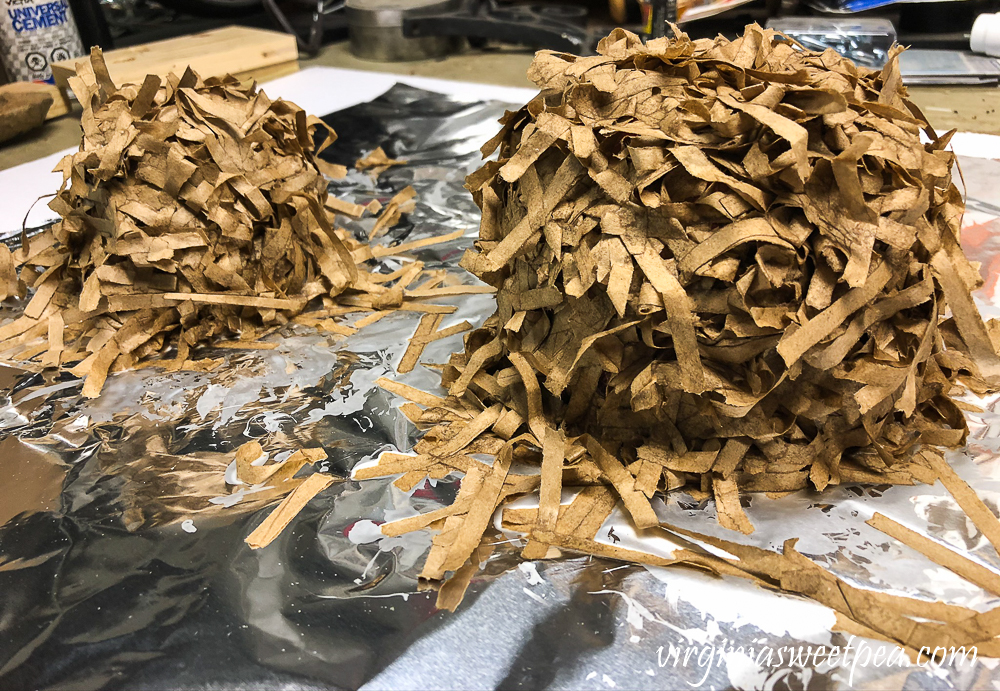
Step One – Shred paper bags with a paper shredder. You could cut the pieces with scissors if you don’t have a paper shredder.
I used six bags to make two nests, one large and one small.
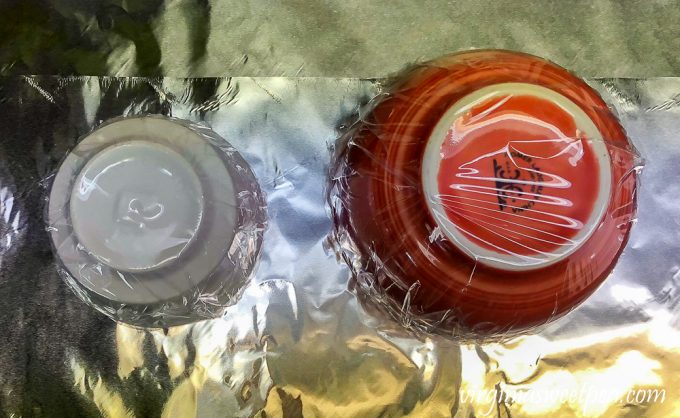
Step Two – Wrap the bowl with plastic wrap from the bottom tucking the extra plastic wrap into the bowl.
I worked on aluminum foil but recommend waxed paper so the nest won’t stick.
Step Three – Mix equal parts water and glue in a bowl.

I had to do this several times and I used 1 1/2 bottles of school glue in the process of making my nests.
Step Four – Dip small handfuls of shredded paper into the glue mixture, massage the glue mixture on the paper strips, then lay them on the bowl until it’s covered.
Allow the nests to fully dry. My smaller nest was dry in a day but the larger one took two days to fully dry.
Step Five – Carefully pull the plastic away from the sides of the bowl which will release the nest.
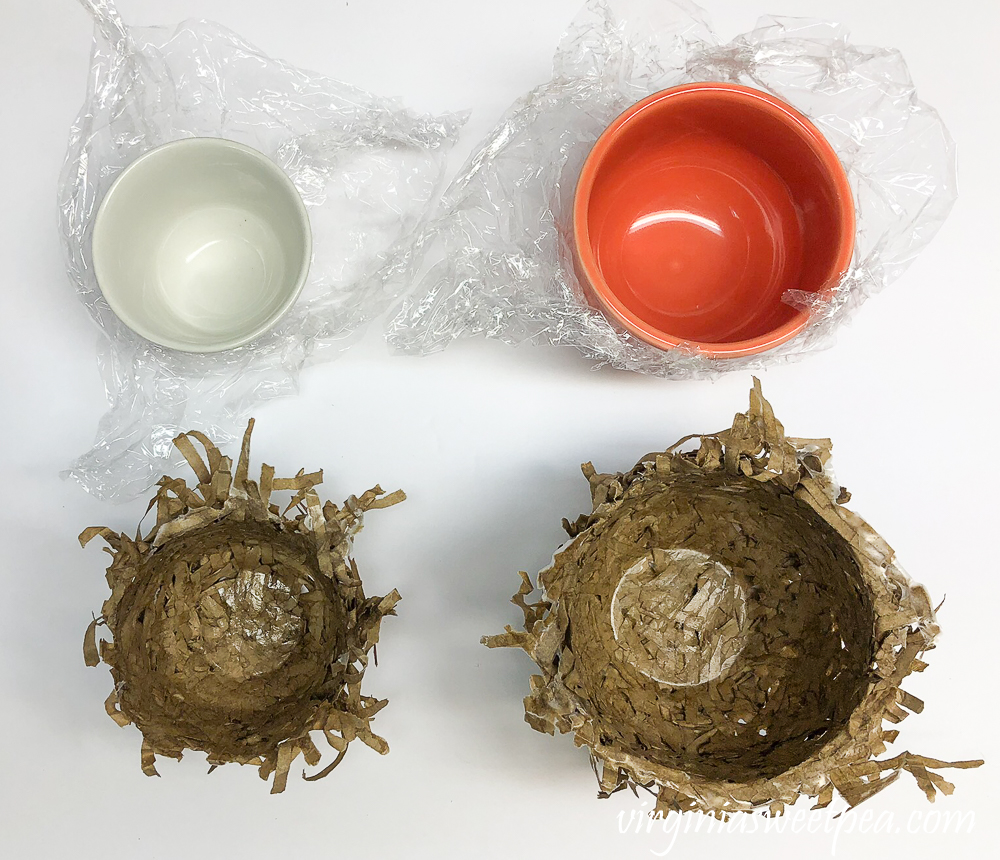
The top of the large nest was caked with dried glue.
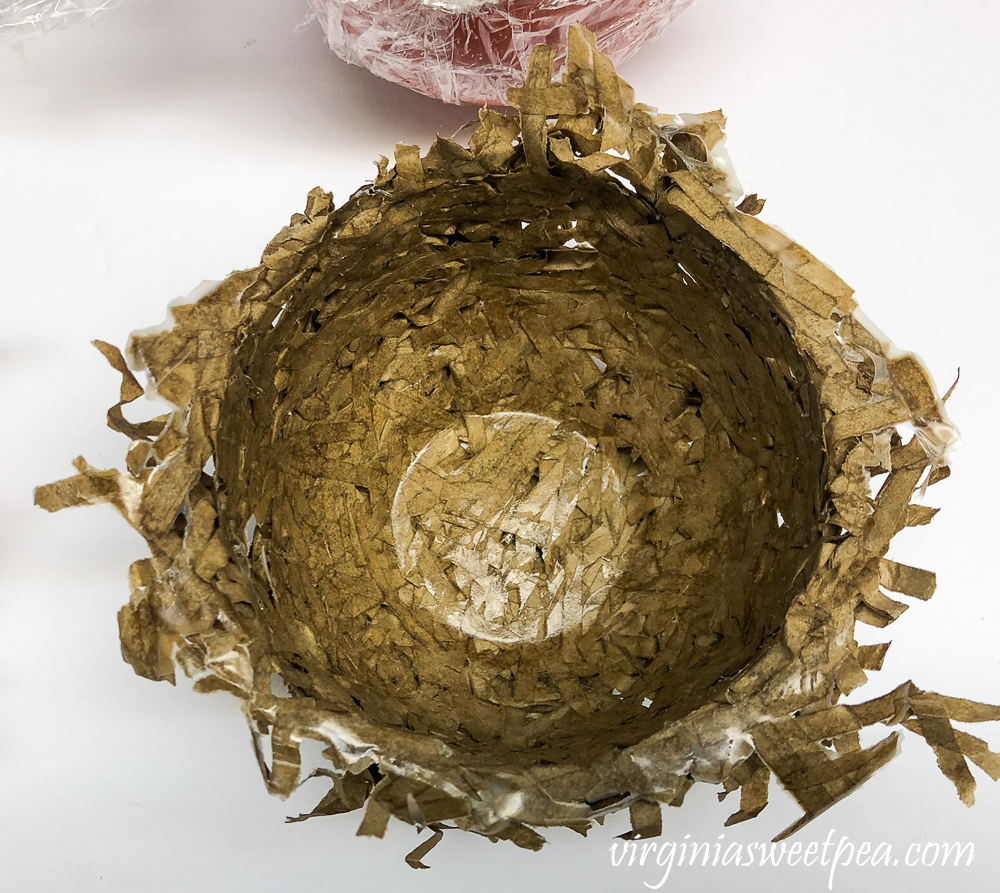
I didn’t like how that looked, so I massaged it with my fingers to break up the glue and to give it a looser look. The smaller nest only needed a small bit of massage.

Decorate the Nests
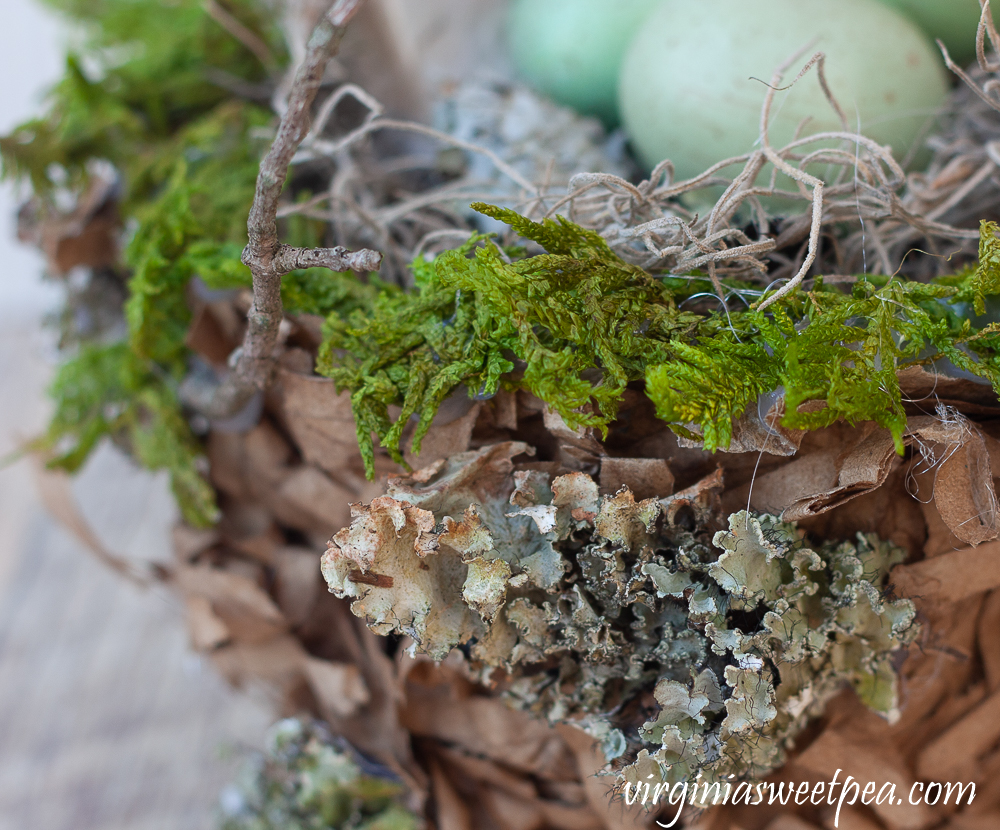
To decorate the nests, I used sphagnum moss and dried green moss from the Dollar Store, lichen found on the forest floor, and dried Catmint stems and tree twigs from my yard.
I started the decorating by gluing moss to the edge of nests using a hot glue gun.
I then filled each nest with sphagnum moss.
Then pieces of lichen were glued to the sides of the nest along with twigs and dried Catmint stems.
The nests were filled with eggs, lichen, and a feather.
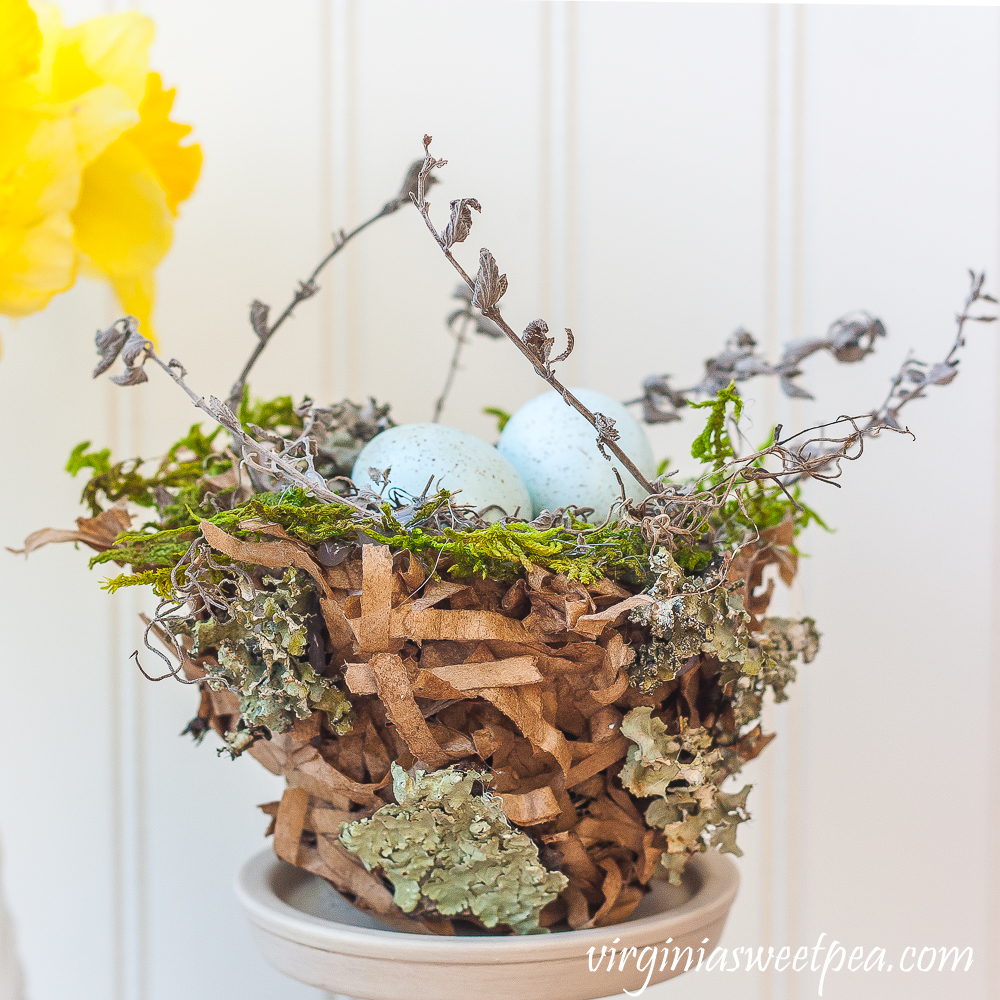
Lichen has the most beautiful colors: gray, light green, and light blue.
Lichen is a symbiotic relationship between fungus and algae. The algae is plant-like and provides food for the fungus. The fungus provides a place for the algae to live.
I love the nests that I created and they cost me not a penny to make as I had all of the supplies that I needed on hand.
Now it’s time to enjoy more spring decorating ideas. Click on the links below to visit each blogger who is sharing their ideas.
Monday ~ Mantels
Hearth and Vine | Postcards from the Ridge | Marty’s Musings
Tuesday ~ Tablescapes
Lora Bloomquist | Our Southern Home | The Painted Hinge
Wednesday ~ DIY
Sweet Pea | 2 Bees in a Pod | The How to Home | Our Crafty Mom
Thursday ~ Recipes
My Wee Abode|Thistle Key Lane|Harbour Breeze Home|First Day of Home
Friday ~ Porches and Decks
Redhead Can Decorate | Worthing Court | Follow the Yellow Brick Home
Oh my goodness I’m going nuts over these nests Paula. This is a great idea and using paper bags to make them is brilliant. Love, Love, Love!
Thank you, Michelle! Making them was a lot of fun as was decorating them. I have both out on my porch now and every time I see them, they bring me joy.
Paula
Paula – we are obsessed with these nests! Our creative wheels are churning with ideas of how to use them in our homes. We love using nests in our spring decor too. Thank you for sharing this wonderful craft with us! The look gorgeous in your home!
Thank you, ladies! The nests were a lot of fun to make and especially fun to decorate.
Paula
That is a super cute idea!
Thank you! I had so much fun making these.
Paula
Paula,
These nest are great!! I have brown shredded paper form using for gifts. I bet I could use that. Love the added moss.
Pinning and will try this if I have time now. If not it will work for summer too.
Cindy
Paper shreds for gift packaging should work well for this project. Let me know if you make some, Cindy.
Paula
Oh my Paula! I love this idea. You know how much I love a good nature craft. These are beautiful and I love that you added bits of living nature to your paper nests. Can’t wait to try it.
Thank you, Patti! I love how these turned out and have been really enjoying them in my spring decor.
Paula
These are adorable, Paula! I,ve been thinking of making some nests…you have inspired me!
Thank you, Linda! I had a lot of fun making these and am enjoying using them for spring decor in my home.
Paula
Oh my goodness Paula – this is sheer genius! I love everything about this and you decorated it perfectly! <3 Thanks so much for including me in the tour!
Thank you, Michelle! I enjoyed making these and am enjoying having them displayed in my home for spring. I’m so glad that you joined the tour. Your tablescape has been popular on my FB page.
Paula
Paula, I was on Tailwind and pinned this nest, but just had to have a closer look. They are so, so cute!!!!
Thank you, Rachelle! I appreciate both the pin and the visit. I had a lot of fun making these nests.
Paula
Wow, Paula-I absolutely love these! You did an amazing job adding the perfect amount of natural textures. I need to make some, but think we just used the last brown lunchbag:( Beautiful decor to tuck in with vintage dishes!
When I had a shop, I made tags for my items using paper lunch bags and I still have a lot leftover. Using paper bags with vintage dishes is a good idea. I look forward to seeing photos of this on your blog.
Paula
Paula, these came out so lovely! The added fillers make these look so real, but just so pretty! I can’t believe that the diy shredded paper nests won’t go viral!
Going viral would be wonderful, Julie! I’ve never experienced that and it would be a real thrill.
Paula
These nests are adorable, Paula! I love your technique. The shredder is such a brilliant idea, too. You’d never know these were homemade, especially with the creative use of moss and other elements. Just beautiful and perfect for spring! By the way, your photos look fantastic, too!
Thank you, Crissy! I had a lot of fun making them and my mom and I enjoyed walking through the woods with Sherman collecting lichen as we walked.
Paula
Oh, and I neglected to say THANK YOU for including me in your tour!
I am so glad that you joined the tour. Your trifle looks amazing!
Paula
Wow, Paula. So creative! I’ve never seen this DIY and I’m totally impressed by it. Such a perfect way to use what you already have! Great job!
Hi Paula! I have never seen paper nests!! I must be lining under a rock!! I love that you can make them with things you probably already have in your house. I’m not sure mine would turn out as pretty as yours, but I would love to try it. Maybe I can talk the kids into helping me, lol. I hope you are doing well, and staying safe at this difficult time. Thank you for pulling us all together! Your basement is also looking fantastic!!
This is so pretty and unique, Paula. I absolutely love it. I am going to try to make a nest or two this year for my decor. Thank you for the wonderful inspiration. xo, mb
These nests are so unique and beautiful!!
Your paper nests are so pretty, Paula. Thank you for the detailed tutorial, I’d definitely like to try making some. Love that they cost nothing to make and require a walk outdoors (feeling cabin fever) in the fresh air to gather the supplies. Pinned
Paula your nests are aboslutely fabulous! At first glance I thought they were real! As I love rustic and natural garden style decor (but I am a bit weirded out by real bird’s nests) I can’t wait to make these! Please do link these up at All About Home on Monday!
Beautiful inspiration. Thank you so much for hosting this hop and having me along!
Paula,
I am so glad that you remembered this project and gave it a go again. It’s fabulous and perfect to do right now while being home all the time. It looks so high-end!! PS….your photographs are amazing!
I love this, I’m a brown paper hoarder, so this is a fun way to create something that looks “real”. the moss and lichen are perfect. Just pinned it!
Paula, this is such an adorable project. And your tutorial makes it look so easy to make. I looking around the house right now to see if I have some elmer’s glue so I can make one for myself. So cute! Thanks for sharing how you made it.
Paula, these are beautiful! I would have never guessed, you are so creative, wonder if you can do with regular grocery bags? I don’t have lunch bags, but have lots of grocery bags, these are beautiful!
Paula! These are some of the neatest things I’ve seen in a long time! They look so fantastic…you did a wonderful job. Thanks for the Easter inspiration!
Hugs,
Lynn
Thank you, Lynn! I really enjoyed making these.
Paula
Oh wow, this is so creative and so beautiful. I love that you found so much of this outdoors. I do love the homey feel of a nest. Nests speak so many things to us about comfort, don’t they? Thanks for sharing your lovely project and linking up with me.
Shelbee
http://www.shelbeeontheedge.com
Thank you so much for sharing my project!
Paula
That’s so pretty, what a lovely and practical idea.
Thank you, Julie! I had fun making them and I can enjoy using them for decor for years to come.
Paula
I’ve seen shredded nests before, but yours are by far, the best. Thank you for sharing at Party In Your PJ’s, you are being featured on my blog Tuesday evening.
Thank you for featuring me, Ann! I really appreciate it.
Paula
Hey Paula, I know I already commented but just want to let you know I’m featuring your post on Tuesday Turn About Link Party. Hope to see you there!
These nests are so pretty! I would have never guessed they were made out of paper bags just by looking at the photos.
Thank you, Michelle! The nests were a lot of fun to make.
Paula
I’ve crafted a few spring nests over the years Paula, but never a shredded paper one. This really is so sweet and I love those added pieces of lichen.
Thank you for sharing your DIY shredded paper nests at Create, Bake, Grow & Gather this week. I’m delighted to be featuring them at tomorrow’s party and pinning too.
Happy Easter,
Kerryanne
Thank you so much for featuring me! I look forward to seeing my nest on your post. I had a lot of fun crafting the nests and I’ll be able to use them for years to come.
Paula
That is darling!! I love it, it’s so perfect for Easter and spring! Very lovely thanks for sharing the tutorial!
These are so cute Paula. I didn’t do much for Easter At.all this year unfortunately 😳
Paula,
These are amazing. I am so making these. How fun and different and adorable are these. Thank you for sharing.
Have a wonderful weekend.
Kris
This is just the cutest idea. Definitely saving this for a future project.
Thank you for sharing to Charming Homes and Gardens Link Party.
Rachel
Once again I’m behind on reading. I LOVE LOVE LOVE this. I’m saving it and also sending to my sister. She will be wild about it too.
Paula, I absolutely love this! It’s so creative and beautiful! Thank you for linking up to the Charming Homes and Gardens party!
Thank you, Kristin! I’m delighted that you guys started a new link-up. I appreciate having a spot to share posts and I enjoy browsing through what other bloggers share.
Paula
These are the sweetest little nests! I adore these, and really want to add this to my to do list! Thanks for sharing!
Thank you, Sarah! I had so much fun making these and I’ve so much enjoyed using them in my spring decor.
Paula
My granddaughter and I had a blast making the paper birds nests with small custard cups. Thanx! Wish I could share a picture.
I would love to see a picture! You can email it to [email protected]. I’m so glad that this was a fun project that you were able to do with your granddaughter.