DIY 2×4 Porch Swing
Can a porch swing be made with just eight 2×4 pieces of lumber? It sure can!

DIY 2×4 Porch Swing
I’ve been wanting a porch swing for our new patio at the lake.
Update: See what the patio looks like now in this post.
Instead of buying a swing, Mr. SP and I challenged ourselves to build a swing using these plans from Jay’s Custom Creations.

Our DIY 2×4 Porch Swing has been in place for about a week and we have really enjoyed using it. The swing is the perfect spot to sit and enjoy the lake view.

I added an outdoor rug from Walmart to soften the concrete and to add a pop of color to the porch. The pillows on the swing are also from Walmart and they cost just $5 each.
The plastic chairs are hand-me-downs that I spray painted turquoise. We hope to soon build a few more wooden Adirondack chairs for this spot or maybe even an Adirondack chair bench. (Our friend purchased this pattern and offered to let us borrow it.)

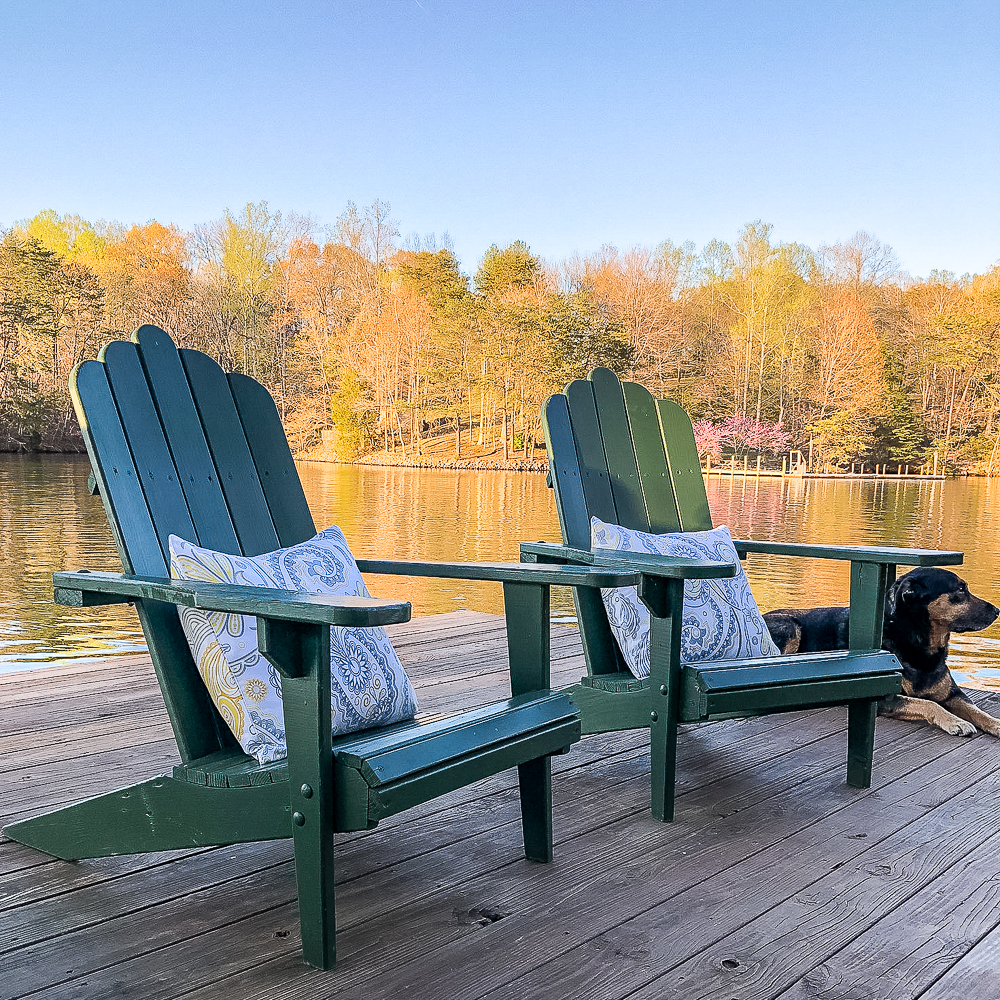
With the addition of the patio at the lake, we can now enjoy relaxing on the deck or on the patio.

The upper deck has four Adirondack chairs that Mr. SP made over the winter.
Our new DIY 2×4 Porch Swing is definitely a great addition to our lake house.


How to Build a DIY 2×4 Porch Swing
We used this plan from Jay’s Custom Creations to make our swing. I highly recommend watching Jay’s video before attempting this project. Thanks for the plans and video, Jay!
This swing was made using eight 2×4’s. You’ll also need deck screws, eye bolts, and chain to hang your swing. As you read this post, you’ll see all of the equipment that we used to build our DIY 2×4 Porch Swing.
Step One – Cut the Arm Boards
The arms are constructed with two 2×4 boards.
The two boards for the arms were run through the planer on both sides to smooth them out and to remove the writing on them.

The 2×4’s for the arm components need to be 3” in width for this project. A 2×4 is 3 1/2” in width, so the table saw was used to rip 1/4” from each side.

Here the blade is set at 3 1/4 for the first cut.

And for the second cut to make the board 3” wide, the blade is set at 3”.

Now we have two 2×4’s that are 3” wide. The strips to the right are what we cut off. I don’t know what we will use them for, but I am saving them because they should be good for something.

Step Two – Cut the Arm and Back Support Pieces
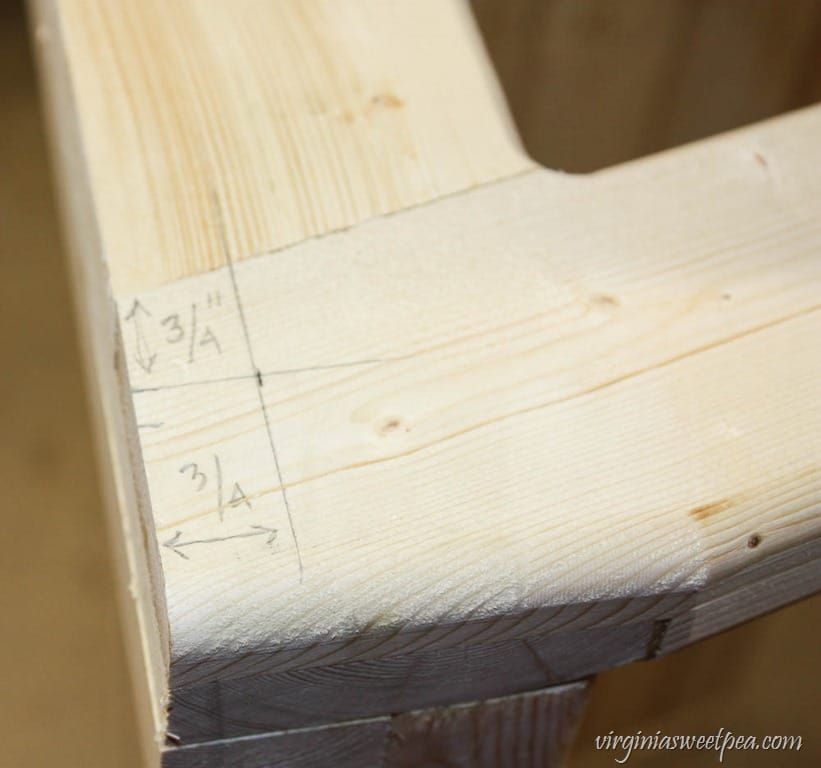
All angles for the arm and back support pieces are 15 degrees. The pieces were cut to length according to the cut sheet below. (Get the cut sheet and directions at Jay’s Custom Creations.)

Using the two 2×4 pieces that were cut to 3” width, the back supports and arm pieces were cut to the angle and widths as specified on the above cut sheet. **Note that the lap joints shown on the cut sheet have not yet been made.**

Here the pieces are put together without the half lap joints.

The spots marked with an X will form the half lap joints.

Step Three – Make the Half Lap Joints
This step requires using a dado blade on the table saw.
Mr. SP inherited a dado blade along with our 1950’s table saw from my grandfather but he had never used it. The metal cover for the blade is only wide enough for one blade so we had to improvise and make a wooden one to use. The blade depth was set to half the thickness of the planed 2×4 (for me, this was 11/16”).
These set up blocks from Woodpecker are handy to use when setting the blade depth on the saw. Kreg also makes a similar set. I highly recommend these!

A jig had to be constructed to cut the lap joints at 15 degrees. Being married to an engineer has its advantages; Mr. SP designed and whipped this jig up in no time. (Watching Jay’s video gives details on how to make this.)

I made a GIF showing Mr. SP making the half lap joints. I was afraid of messing these up, so I let him do them all.

Here you can see one of the half lap joints cut. The area marked with the X is where the next half lap was cut.

The jig had to be adjusted to make the inside back support lap joint.
You can see below where the cut will be made on the bottom board; It will match up with the joint of the board I placed on top for demo.

The jig had to be adjusted again for the outside cut. Make sure that your jig is in the proper place before cutting!

The pieces fit together almost perfectly. Pretty amazing considering we were using a 60+ year-old saw and a make-it-yourself jig.

This view better shows how the half lap joint fit together. Note that the two arms are mirror images of each other.

Step Four – Glue the Arm Pieces
It is critical that the two arm and back pieces have the same angle, so we glued them first.
We clamped them together to keep the angle the same while the glue dried. A workshop can never have enough clamps!

After the glue was dry, we glued and clamped the rest of the arm pieces.

Step Five – Plane the Arms
Our half lap joints were slightly proud (< 1/16″), so we ran the arms through the planer to make them smooth on both sides.
We could have sanded both sides but using the planer was easier and saved time.

Step Six – Trim the Arms
A corner was cut off both arm assemblies per the instructions.

Step Seven – Sand the Arms
Use a belt sander to sand the edges of both arm assemblies.

Step Seven – Rout the Edges
Use a 3/8” roundover bit to rout the both the inside and outside edges of the arm assemblies – with the exception of the inside back and bottom edges.

Step Eight – Cut the Slats and Slat Supports
The remaining six 2×4’s were planed on both sides and then cut in half to form twelve 48” pieces.

Eleven of the 48” pieces form the slats for the seat and back and the remaining piece was ripped using the table saw to make two pieces of roughly 1-1/2” x 1-1/2”

The same 3/8” roundover bit was used to route the seat and back slats.

.

Step Nine – Add the Slat Supports
Cut the Slat Supports to the back and bottom lengths, then glue and screw into place. (Use 2 inch exterior deck screws for this step.)

Step Ten – Install the Slats
The first slat to be installed is the front seat bench slat. We used clamps and clamping squares to make sure that the swing would be square. (Clamping squares are a super handy tool to have!)

Here is another view of the how the clamping square is used.

We pre-drilled and countersunk the holes so the screw heads would be flush with the board face.
Screw the first board into place using 1-1/2” exterior screws, then lay out the other seat boards. Use a woodworking rule to draw a line to use as a guide for screwing in the remaining screws.

The boards were spaced 1/8” apart. Here you can see another handy use for a depth guide.
Screw all of the seat slats into place, then follow the same procedure to screw the back slats into place. Start with the top back slat.

Now the seat and back slats are in place. Use a palm sander to remove the pencil marks from between the screws.

Step Eleven – Screw on the Eye Bolts
Four 3/8” x 6” eye bolts with nuts and four 3/8” galvanized washers are needed for this step. (I’m not sure where the fourth eye bolt is in this picture!)
Measure and mark where the hole is to be drilled.

Drill the hole and screw in the eye bolts.


Step Twelve – Hang the Swing
Since the swing that we built was 53″ (center-center of the eye bolts), and our deck joists were 12″ center-center, we had to improvise a solution. We added these 2″x 8″ boards between the existing deck floor joists using these joist hangers. This made centering the swing under the deck easy.
We purchased a porch swing chain set from the local hardware store. It came with all the necessary hardware to finish the project as shown with the exception of the four zinc-coated quick links that connect the chair’s eye bolts to the chain.

Here you can better see how our swing hangs from the ceiling.

Enjoy Using the DIY 2×4 Swing
We are 100% pleased with the end result of this project and anticipate many pleasant hours spent swinging on our porch.


Our View from the Swing
We have a beautiful view from our DIY 2×4 Porch Swing and are sure to enjoy using it in all seasons.

Click here to see more outdoor projects at our lake house and to tour the inside of our home.

If you like this project, pin it so that you don’t forget it. Pinning also helps others to discover it on Pinterest.


What’s next at the lake? We’ve been working on the landscape and have purchased hoses for both the back and side faucets. Hose hangers are next on our DIY woodworking project list.
We love our Smith Mountain Lake house. You can see all of our lake house projects here.
Favorite Projects
If you liked this post, check out more popular projects.


Great Project!
You guys are incredible!
We need to team up to make that Adirondack bench!
I’m always so impressed with your building projects! This looks awesome! I bet you use it all the time. Hope your summer is going well!
Thank you! I’m so happy to have this new swing. I hope you are having a great summer!
What a lovely project! Who knew it could be so easy!? I wish I had somewhere to hang one.
I’ve never had a spot to hang one until now. I’m looking forward to swinging in it this weekend.
Came out great enjoy it.
Thank you! I’m hoping to enjoy it for many years to come.
I have been wanting to make a porch swing! Thank you for the tutorial……definitely pinned this one! I am so happy I found your site through the linky party. Nice to find other woodworking sites:)
Thank you! This was one of the more complicated projects that we’ve completed. We are so happy with the end result!
Your swing…. AND your view… look wonderful! 🙂
Thank you! We are really enjoying our new swing.
Great job on the swing! I love how you can face the lake. Your porch would be my favorite place.
Thank you! I can’t wait to get to the lake for the weekend. I’ve had a hurt back for over a week and am not sure that it will allow me to swing, but I can certainly sit and enjoy our view.
This looks like the perfect spot to relax all summer long!
I love this Paula, and what a view! Thanks for sharing @Vintage Charm! Pinned!
That is too cool! I would love one of those on our porch!
That is too cool! I would love one of those on our porch! What an awesome project!
Girl, you never cease to amaze me. What a gorgeous swing you’ve built here–and you have the PERFECT spot for it there at SML! I LOVE this, and your instructions make me think that I could build one myself. Thanks for writing those out so carefully.
And thanks for joining the Grace at Home party. I’m featuring you this week!
What a gorgeous well designed swing. Its wonderful. You obviously took alot of effort to provide a very good tutorial as well.
A beautiful swing for a beautiful setting. Thanks for sharing. Pinning.
love…love! This is an awesome swing Paula! Especially with your fabulous views my friend! I have no doubt you’ll enjoy many evenings here with a cool drink swinging and watching the sunset.
What a great porch swing – gotta love 2×4’s!
It is amazing what can be made with a few 2×4’s!
OMG Paula, I love it! This is the coolest project, and now I have serious porch envy. We don’t even have a porch, or I would totally attempt to make one for myself. 🙂
Lol, I got so excited about this swing I forgot to tell you that I stopped by in the first place to let you know that you were featured as a Rockstar at last week’s Creativity Unleashed party! Congrats, and thanks for sharing at our party! http://www.practicallyfunctional.com/creativity-unleashed-183
Hello, awesome swing and great view! I will like to know the measurements of the links? And what is the black thing on the links that are in the ceiling? Does that comes with the links? Ty!
Thank you! To hang the swing, We purchased a porch swing chain set from the local hardware store. It came with all the necessary hardware to finish the project with the exception of the four zinc coated quick links that connect the chair’s eye bolts to the chain.
Paula