DIY Upcycled Wood Jewelry Organizer
Over the past year I’ve acquired quite a few necklaces and bracelets and I did not have a good place to store them. I recently made a DIY Upcycled Wood Jewelry Organizer that hangs on my closet door.
This organizer keeps my necklaces and bracelets in one spot and visible so that I can easily choose what I want to wear with a particular outfit.

My 1950’s house has small closets and I never have enough room. I would love to have a walk-in closet with plenty of storage for clothes and shoes but that is not the case in my home.
Our master bedroom has two closets and mine is the smaller of the two. I keep some of my clothes in this closet and the rest in a closet in the computer room next to our bedroom.
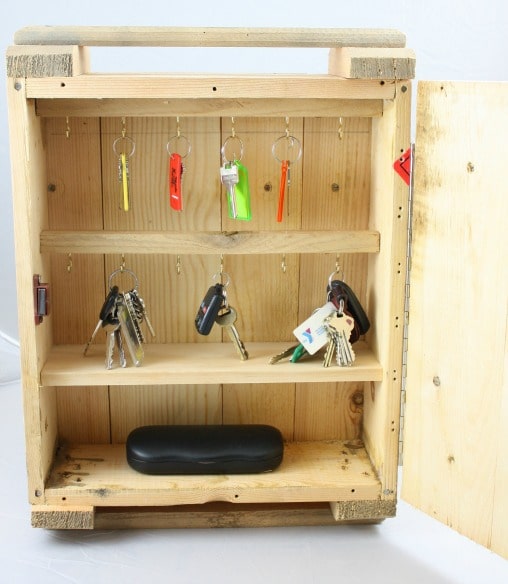
The DIY Crate Cabinet that we made a few years ago takes up some hanging garment space in my closet but I love the storage that its drawers give me.
My new jewelry organizer hangs above the closet door mirror high enough to keep most of the necklaces from blocking the mirror but not so high that I can’t easily reach my jewelry.

I love how this project turned out and I’m so glad to no longer have all of these necklaces and bracelets spread out across my dresser.

How to Make a DIY Upcycled Wood Jewelry Organizer
Supplies
- Upcycled Wood
- Hooks with Screws
- Saw
- Center Rule – This is a SUPER handy tool that finds the center of a any item without measuring!
- Aul
- Drill
- Router and Keyhole Bit
Procedure
Select Wood
For my jewelry organizer I used a board that once was a part of a piece of furniture. This was in my grandfather’s shed and it’s hard to tell where he got it. He did a lot of furniture repair and refinishing, so he probably thought that he would eventually use it for something.
I ended up with this furniture piece and it’s been in my basement for many years waiting to be used for something. I’m delighted to finally get this out of the basement and to have a use for it.
Pallet wood, scrap wood, or new wood could be used for this project.

Cut Wood to Size
Determine how wide the jewelry organizer needs to be and cut the wood to size.

After cutting the wood to size, the top edges were rounded off using a bandsaw.
Add Keyholes
Keyholes are a great way to hang a piece like this because the piece hangs very securely to the wall. Use a router with a keyhole bit to route the keyholes.

Add Hooks
I used six Matte Black Double Pronged Hooks from D. Lawless Hardware for this project. The easiest way to figure the spacing for the hooks is to use a center rule.

To use the center rule, place the zero in the center of the piece of wood. I determined that my hooks should be four inches apart, so centered a hook over each of the 2’s.

The next two hooks were centered over the 6 and 10.

To make sure that the hooks were parallel to the bottom of the board, I used a scrap piece of wood.

A Kreg Multi-Tool makes measuring for this type of job easy. Make sure that the board is exactly parallel to the bottom and in the correct spot, then make sure that each hook is seated evenly on the scrap wood.

Use an aul to mark where to drill holes for the screws. You may have noticed in the pictures above that the holes were already marked and drilled. I forgot to take pictures as I completed those steps.

Use the screw size that comes with the hooks to determine the bit size for the pilot holes. Drill pilot holes for each screw.


Done! This is a quick and easy project.
The Finished Product
I love that I found a use for this beautiful old furniture piece. If I ever get tired of using it for jewelry, it also could be used to organize scarves or belts.

All of the jewelry on my organizer is from Rocksbox. Rocksbox is a jewelry subscription service that sends three pieces of jewelry that you can wear for as long as you like each month. When you send your three pieces back, or buy what you like, a new box is sent.
If you’d like a free month of Rocksbox, sign up with this code: PAULABFF54. I rejoined Rocksbox a little over a year ago and I LOVE their service. I’ve received the cutest jewelry and have purchased quite a few items. In fact, I purchased so many in a year’s time that I needed a place to keep it!
Pin It!
Please pin this project so that you don’t forget it and so that others can discover it on Pinterest.

Favorite Projects
If you liked this post, check out more popular projects.

Clever,attractive, useful
Thank you, Gail! I’m so happy to have a way to organize and display my jewelry.
Paula
Very nice! What a beautiful, rich piece of wood!
Thank you! I am so glad to be able to find a good use for this pretty hunk of wood. I saved the end pieces and I hope that one of these days I’ll come up with a way to use them as well.
Paula
That’s a great idea! I always struggle to get those necklaces organised!
Thank you, Nancy! I’m so glad to get those necklaces off of my dresser.
Paula
Great idea. That was a foot board to a very old bed.😊
I’d like to have a fancy bed like that!
Paula
I love how this turned out- such a pretty piece and what a good use that you can see and enjoy everyday!
Thank you! I’m so glad to get this piece out of the basement and where it’s useful and being enjoyed.
Paula
Paula! I love your upcycled wood jewelry organizer!!!! Pinned, and featuring you next week on Talk of the Town!
gail
Thank you so much, Gail!
Paula
Hi Gail I think it’s such a shame you cut this beautiful piece of furniture with its curved ends would have made a lovely hanger for hats scarves etc were it could have been seen !!!
Frances
I would have used the entire board if I had a spot large enough to hang it. It was a shame to cut off the curved ends but now it’s being used and enjoyed rather than stuffed in my basement.
Paula
That turned out really cute Sweet Pea. I’m looking forward to seeing more from you.
Thank you, Esther! I am glad that you are here.
Paula
Love this idea. So cute. You did a great job.
Thank you so much, Pamela! It’s great to get all of that jewelry off the top of my dresser and where I can easily see what I have.
Paula
BEAUTFUL!
I love the tip on the keyhole- because it will not rock on the wall- Brilliant
xo Lisa S
Keyholes are great! We’ve used that router bit for several projects. Glad we finally invested in it.
Paula
I absolutely adore this project Paula. It is so cute and clever!
Thank you, Laura! I think my granddad would approve of how I used this.
Paula
Paula, you found the perfect furniture piece for this project! I love how it turned out. Thanks for sharing at Vintage Charm–pinned!
Thank you, Cecilia! I’m so glad to get this out of my basement and in a spot where I can use and enjoy it.
Paula
Perfect timing, I have a slightly similar piece that was the top of a buffet. I have been holding on to it for years trying to decide what to do with it. Yours turned out lovely!
Thank you, Patty! I would love to see your project once it is complete.
Paula
I absolutely LOVE upcycles like this!! So lovely and practical to boot! Thanks so much for linking up and sharing!
Thank you, Lidia! I’m loving having my necklaces off of my dresser and on this organizer.
Paula
This is amazing. I am going to be on the lookout for a piece like that. Thanks for sharing at the To Grandma’s House We Go DIY, Crafts, Recipes and More Link Party. I pinned this on Pinterest! Hope to see you next week.
Thank you so much for sharing my project for this week’s party, Sheri! I really appreciate it.
Paula
Such a clever repurposed jewelry holder. It turned out great!!
I have pinned and your post is being featured on #omhgww this week, hope you will stop by and share again!!
Have a lovely week!
Karren
Thank you so much for featuring me!
Paula
Paula, what a beautiful organizer! And your tutorial is so helpful… I never knew about a ‘center ruler’ until just now! Genius! Thanks for sharing at Homestyle Gathering, and for teaching me so many new things today!
Love your pictures. Your home is lovely. I see what you mean about the map. Wonder if you lowered it a bit, topped it off with an old window frame with the panes dry brushed with a transparent coffee colored glaze, just to dull colors a bit. Or just topped with a glazed plexi. I walk on the neutral side of life. Thanks for your blog!!!
That is a great idea! Thank you so much for the suggestion.
Paula
This is beautiful and fabulously functional, but what I love best is that I now have learned that a centering ruler exists. (How have I not known this ever before. Four decades on this earth and this somehow eluded me!)
Great job — I really enjoyed your blog!
It is a wonderful tool!! It’s great when you don’t have to actually measure and then do any kind of math. Well, for me it is!
Paula
Paula, what a great idea, I am pretty sure I have an old mirror from an antique dresser, might have to get creative and do something like this as well!
That would be a great way to use an old mirror. I hope it works for you!
Paula
This is a wonderful way to showcase a beautiful piece of wood! Thank you for sharing at Party In Your PJ’s.
What a great idea! I always love storage projects that make use of vertical space, and this one is so beautiful.