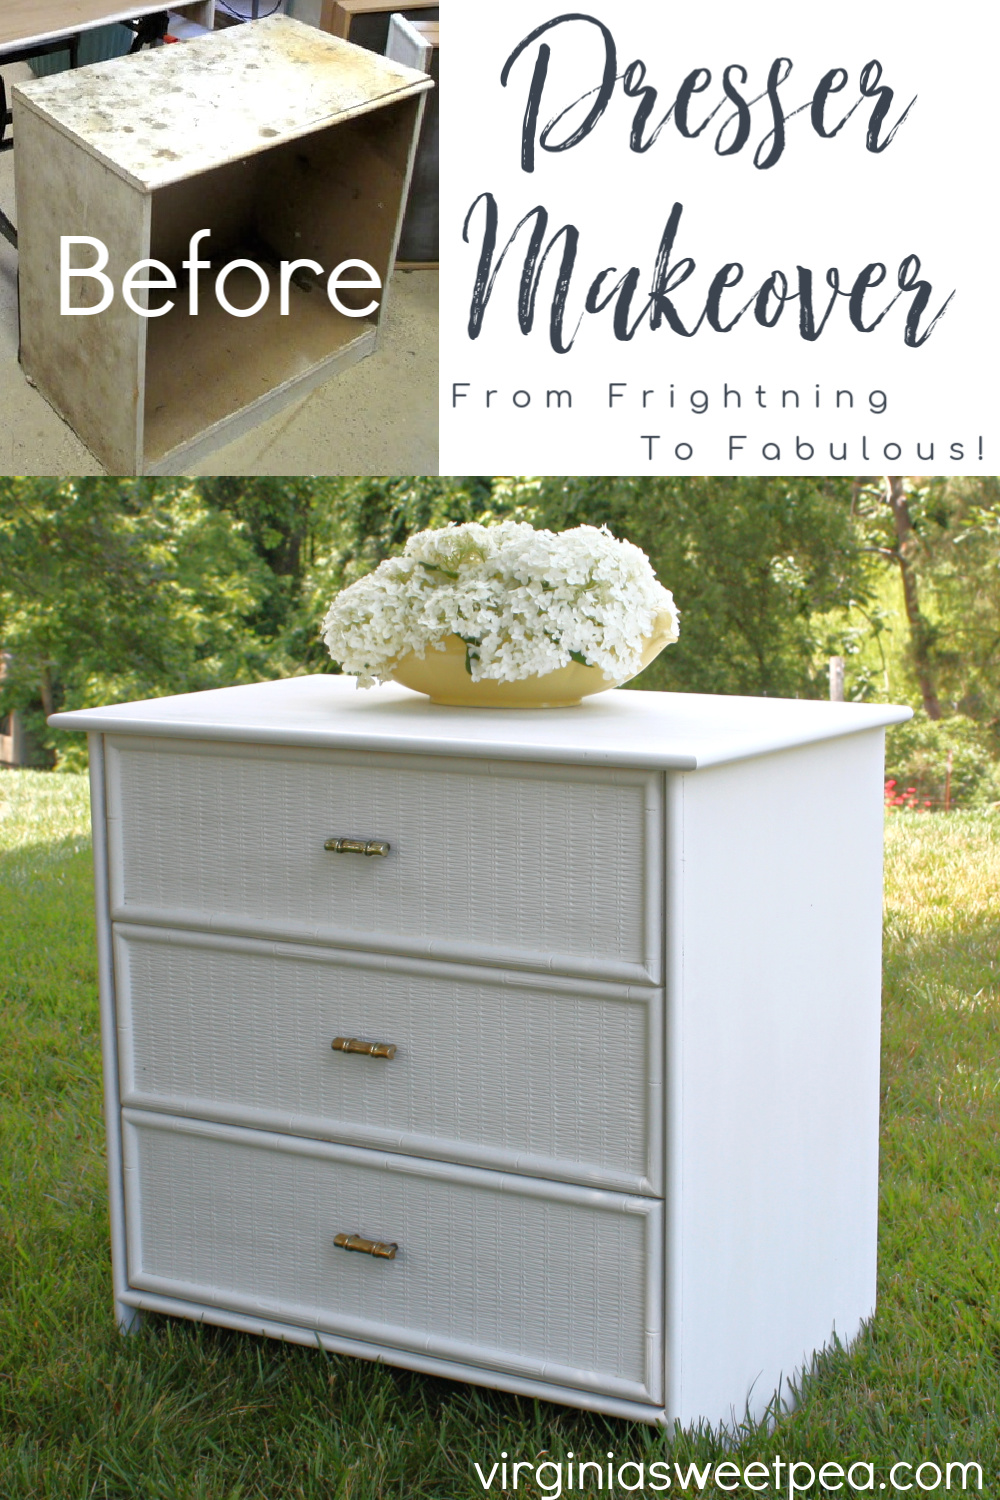
From Frightening to Fabulous: A Dresser Makeover
A partly new/partly used dresser has joined our household. This dresser got a makeover and is now in use in a guest room at our lake house.

Are you wondering how it can be partly new and partly used?
In 1990 my brother rented his first college apartment and needed a dresser for his room. My mom found one for him to use at a yard sale.
After his college years, the dresser was no longer needed and my mom stored it in her barn.
Last spring I spotted it there and asked my mom if I could have it. On that trip, I could only fit the drawers into my car and left the frame of the dresser in the barn. Last summer I painted the drawers with white chalk paint and waxed them.
This winter I retrieved the dresser frame from the barn and Mr. SP and I decided that we would build a new cabinet frame as the original one was delaminating and the plastic drawer slides were broken.

Handy Mr. SP built the dresser frame while I was vacationing at the beach, so I’ll let him explain how he did it.
How to Make a Replacement Dresser Frame
The dimensions were taken from measuring the old dresser. The only critical dimensions were those of the inside of the cabinet, since the existing drawers were to be used. Therefore, some liberties were taken with the outside dimensions. The top was cut slightly larger for aesthetic purposes, and the legs were cut slightly longer, and the depth was cut slightly deeper than the original.
5/8” oak veneer plywood was used to build the new dresser cabinet.
Four pieces were cut for the 2 sides, top and bottom of the cabinet. The hand held circular saw was used for cutting these pieces.

Because the oak veneer is only on one side, it is important to note which side is the inside and which will be the outside of the cabinet.
The next step was to cut a dado joint in each of the inside vertical side pieces. The top edge of the dado was the critical dimension so that the inside of the cabinet would be appropriate for the three drawers to fit.
A hand held router with a 5/8 “ dado bit was used. A cutting fence was used so that the cut would be straight. I cut the two boards side by side in one long cut to ensure symmetry.

The bottom and side pieces were dry fitted prior to assembling.

Next a rabbit joint was cut on the inside back edge of each piece for the cabinet back to be installed using the router table![]() .
.

Next, using the Kreg pocket hole jig![]() , hole were drilled into the inside top side pieces so that the top could be screwed into place.
, hole were drilled into the inside top side pieces so that the top could be screwed into place.

All the pieces were then dry fitted and then assembled using glue on all the joints with the addition of the pocket screws to hold the top firmly in place. Box clamps were used to hold everything square during the cabinet assembly.

Edge banding was needed to cover the visible plywood edges. We decided on using pine 5/8” half round molding to cover the edges. These were cut to length, glued into place, and held with painter’s tape.

Once the cabinet was assembled, it was laid on its side, and the drawers inserted so that the drawer slides positions could be determined.
The drawers were squared up to the back and the positions of the slides marked and measured.
The slides were cut from scrap plywood and glued into place.
Additionally, the back inside dimensions of the rabbit cuts were measured. A scrap piece of luan was cut and nailed into place using brads. This will also help with structural stability and keep the cabinet square.

The finished cabinet (sporting its first coat of primer) is shown with the old cabinet for comparison. Here, it can be seen that the back was inserted.

The existing drawer pulls were to be used. However, they had tarnished terribly over the years, and were polished using a buffing wheel on the tabletop grinder. Some patina was left to accentuate the details.

The drawer pulls were attached to the drawers and the drawers inserted into the painted cabinet.
We love the wicker pattern on the drawer fronts combined with the bamboo trim and drawer pulls.

This dresser is no longer frightening and now is quite fabulous!

What do you think? We both are quite please with the end result of this dresser makeover.
Wow, what a great transformation. I wish I had the tools to take on a project like this. Great job on the dresser.
Looks fabulous! 🙂
I would say that you both should be over the moon pleased with the fabulous work you did!…Beautiful !!!…
Indeed, quite fabulous!! This needs to be y’alls full-time work!! So talented. -Bev
Oh yes, it looks so much better. So clean and pretty. I love it!
Wow! Go Mr. SP! Way to build that! I love how it all came together. It is amazing how just a little polishing made those handles come back to life. It must be so nice to have an item with such a fun new/old memory attached to it! The best of both worlds!
Looking good… but then your projects always look amazing! Do you rent out Mr. SP? 🙂
Wow girl, I love how Mr. SP was able to build a new frame and salvage those textured drawers!! Amazing transformation!
Wow, it never ever occurred to me that you could build out a frame for a dresser. Totally pinning.
Love the crisp look. Cool!
What a labor of love and it turned out beautiful!
Paula, this project is great. Mr SP did a wonderful job!
Thank you, Sherry!