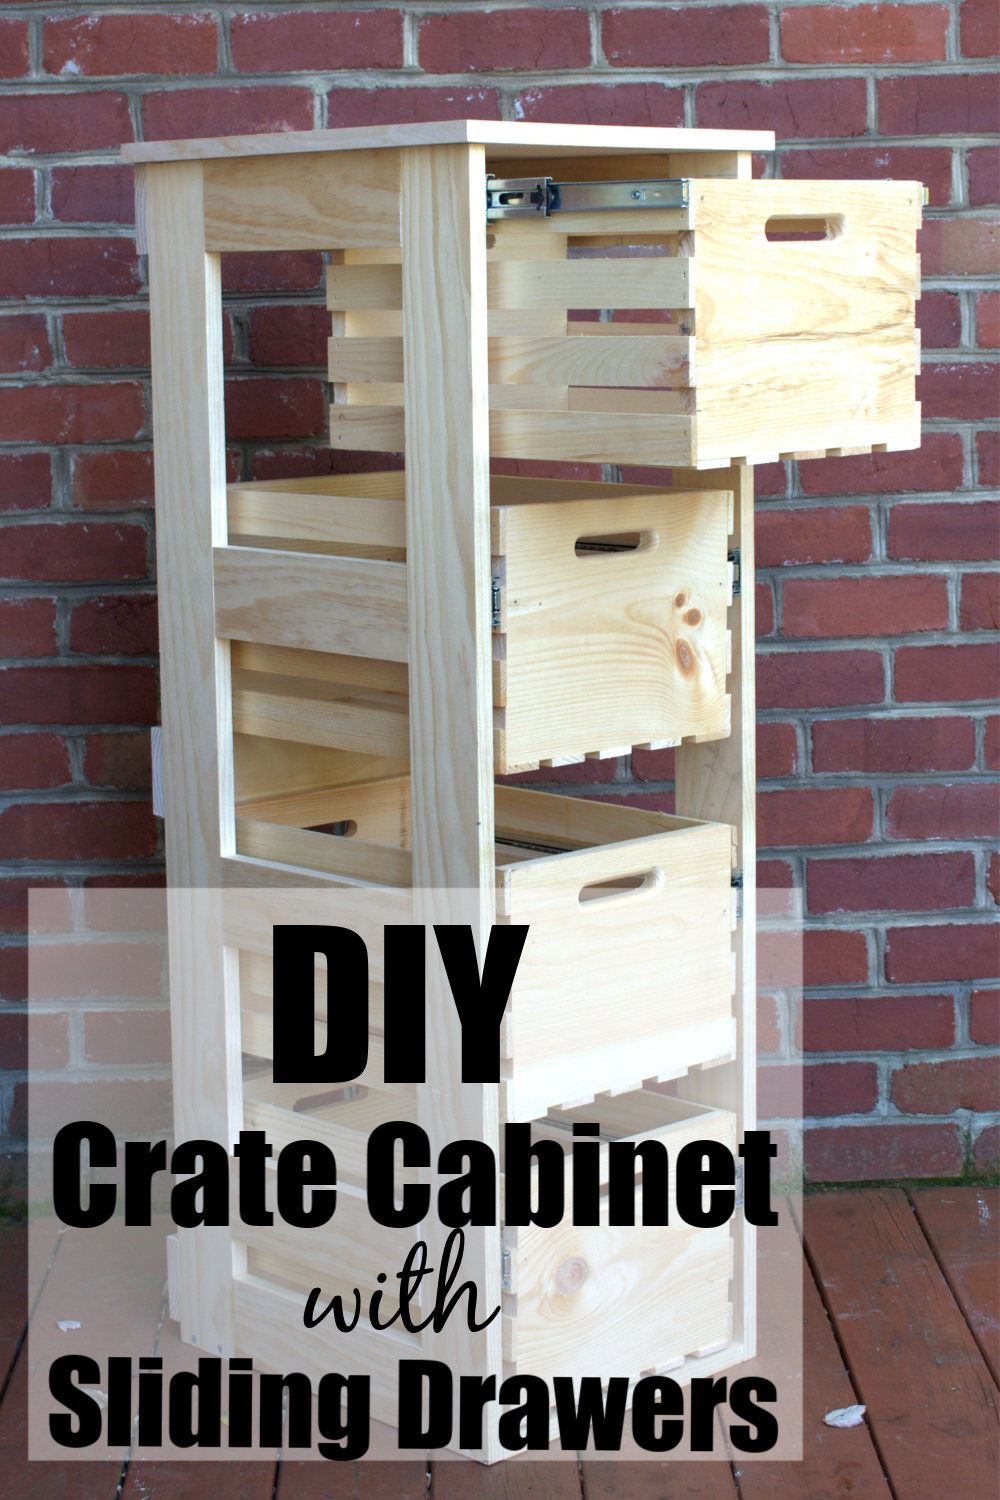
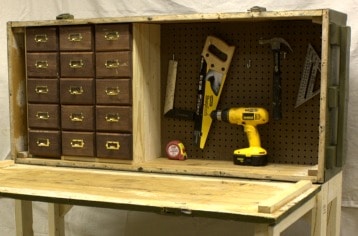
DIY Crate Cabinet with Sliding Drawers
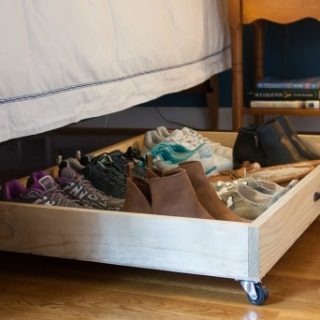
Have you seen the handy crates that Home Depot sells? We used four of these crates to make a DIY Crate Cabinet with sliding drawers.
When I was at Haven over the summer there was a display showing uses for crates and ideas for things that could be made using them.
A cabinet made with crates serving as drawers caught my eye and I immediately knew that I wanted to make one.

Mr. SP and I decided to make our version of this project with four drawers instead of three.

Note that the drawer slides allow the crate to come out enough for full access.

This storage cabinet has endless possibilities for use. Some ideas include storage for:
- Toys
- Crafts
- Tools
- Fabric
Since I’m a teacher, I can think of a million ways that I could use this in my classroom. It’s not going to school, this baby is all mine!

How to Build a DIY Crate Cabinet with Sliding Drawers
Materials Needed
- 4 Crates from Home Depot
- 4 – 4” x 1” x 8 ft. Poplar Planks
- 1 – 1” x 2” x 8 ft.
- Oak Veneer Plyboard for the Top
- Oak Veneer Tape
- 4 Pair – 16” Drawer Slides
- Miter Saw
- Circular Saw
- Kreg Pocket Hole Jig
- Drill
- Clamps
- Hammer
- Clamping Square
- Metal Woodworking Rule
- Wood Glue
- Finishing Nails
- Deck Screws


Procedure
1. Use the miter saw to cut 4 vertical side pieces 4 feet long.
We chose to make our cabinet four feet tall but we could have made it a bit shorter and spaced the drawers closer together or made it a bit taller and spaced the drawers further apart.

2. Cut 12 – 11”long pieces for supports used on the sides and bottom of the cabinet.
Five pieces are used on each side, and two pieces across the bottom of the frame.

3. Cut 3 – 15” pieces for supports for the back of the cabinet.

4. Cut 8 – 1 1/4” x 16 1/2” boards to attach to the inside of each crate for some added reinforcement where the drawer slides will attach.
We used our table saw to rip wide boards in half, and then the miter saw to cut the boards to length.
Glue each piece to the inside of each crate where the drawer slides will be placed.

Nail each end for extra strength.

Attach the drawer slide to each crate.

5. The next step was to make the cabinet sides.
We attached the top and bottom connecting pieces by using a Kreg Jig to make pocket holes.

We figured out where we wanted the other 3 supporting pieces by spacing the crates out along the frame.
We then added the other three supporting pieces and made the second frame identical to the first.

6. The next step was to attach the drawer slides to the frame.
We placed each crate in its spot on the frame.

And then we marked where each slide should go.

The slides were then screwed to the frame. We used a square for accuracy.

After the slides were installed on one side piece, we clamped the two sides together because each side will be the mirror image of the other.

The slides were then installed on the second cabinet side.

The drawers were then slid into place.
Note that the two frame sides are not yet connected to each other. We thought that this method would be the easiest way to ensure that the cabinet was wide enough to fit the drawers and slides.

7. The next step was to square the cabinet. Clamping squares, clamps and a scrap board helped us with this step.

After the cabinet was square, we screwed the bottom supports into place.

We then screwed the three back supports into place.

8. We then cut a 16 1/4” x 19 1/2” top for the cabinet from oak veneer plyboard and glued it into place. We wanted a finished look, so we chose to cover the raw edges of the plyboard with oak veneer tape.
Glue was applied to the veneer tape and held in place with painter’s tape until the glue was dry. Veneer tape is easy to trim with a box cutter after the glue is dry.

The veneer tape really gives the top a finished look! I didn’t think we needed to complete this step but I’m glad that Mr. SP insisted that we do so.

This project was a lot more involved than I imagined it would be when we started it but I’m so glad that we completed it.
I learned more about woodworking while completing the project and we now have a storage piece that we will really enjoy using.
Mr. SP wants to take this to the lake where we’ll either use it for tool storage or for beach towel storage. Either use will be a good one!

Where would you use this in your home? You might give me another idea for where to use mine!
Favorite Projects
If you liked this post, check out more popular projects.


What a great idea! I love it.
I just pinned and shared on my facebook page 🙂 I just wanted to thank You for Your great ideas !
That is a sweet idea Paula! I can think of a lot of things to store in something like that. Pinning.
Paula, this is great! You did such a good job, and what a cool piece you’ve created. My son LOVES those storage crates–aside from being practical, he just likes the look of them. He uses three of them stacked on one another as bookshelves in his room. I think he would really like this piece, and making it would be a great woodworking project for him. Thank you for such thorough instructions!
Can this be printed as a PDF?
I don’t have the plans available as a PDF. That is something that I should do.
This is genius! It would be great for storing potatoes and things that need a little circulation. Plus it just looks awesome. Nice job!
Wow, what a clever project! You could use it in a pantry or garage or just about anywhere. I always love crate projects. Thanks for the inspiration and great instructions!
That is awesome Paula!! How creative, love it! I could find all kinds of use for that! 🙂
Nancy
What a great idea. You created a great piece with lots of storage idea for any home. I have LOTS of things to fill it up with 🙂
Thanks for sharing.
Have a great week.
Love this! I could use one of these in so many places!
This is amazing, Paula! I love that you are fearless when it comes to building! Fantastic job! ?
You and the mister are amazing…love this!!!
Thanks so much for sharing at AMAZE ME MONDAY.
Blessings,
Cindy
This is so awesome! I love what you have done with the crates and I am pinning for future reference.
This looks awesome!! Once again, I am amazed by your skills. This is such a neat piece to have – definitely a lot of storage options.
Great job, we love the look and simplicity! Featured on Ana-White.com today!
I see Home Depot has several crate sizes, what size did you use?
How did you get all those pieces of wood from three 8″ planks? Can’t happen. I gotta run back to Home Depot for several more planks.
It worked for me. Sorry you had to make a Home Depot run.
Paula
Bob I had the same problem. I was only able to get about 8 of the 11″ long supports from the 3rd piece of wood.
Such an amazing idea! This is a great DIY for the fall. Thanks for sharing. Stopping by from Create and Crave.
This is cool! Would make some neat kid toy storage that’s attractive too. Anyway I shoul start a Pinterest Board called Projects for my Husband to Make and put this on it! 🙂 Thanks for sharing on Family Joy Blog Link-up. Please come back and join us again! Remember to leave your host a comment to increase the chance of being featured.
Paula great share over at Wine Wed just pinned btw not sure if anyone else experiences this when they visit your page but your pop up ads make it very difficult for your page to load and move around your page in.
Thank you for letting me know about the difficulties that you are having, Mari. I will investigate with my ad company.
How clever! I can think of so many uses for this cabinet. Pinned and sharing. Thank you for linking up to Family Joy Blog Link-Up Party this week!
Thank you for this clever and perfectly tutored post. I have recently been gifted a lot of old milk crates. I have been struggling to find a way to use them and still be able to see all the old graphics on them. This is a great idea.
Keep smiling and creating.
Wow what a great project. I will be featuring this tonight at my Fall into Fall party that opens at 8pm EST. Please stop by and pick up an I’ve Been Featured button. Thanks. http://diybydesign.blogspot.com
Hi Paula! Just joined your site. What a pleasure looking through all you have created over the years! I was a searching for ideas on creating a nightstand with crates/wine boxes as drawers! Hence, Sweet Pea! Although I love what you did, I am trying to think of a different/easier way??? I am not as handy as you with all the different tools and my husband is not my crafting/creating buddy!!! Oh how I wish he was!! I am curious though, about ( hoping you remember) the cost of your entire project?? Look forward to hearing back thanks much!
Hi Virginia,
Thanks for a great blog and detailed steps on doing this. I am thinking of doing the same for my kitchen pantry. The concern I have is weight. How much weight can the pull out slides hold? Esp. the bottom shelf I predict will be pretty heavy.
Should I consider putting the slides under the crate for the bottom most shelf? Your thoughts?
Thanks,
Kedar
Great idea and lots of hard work, but it looks so worth building! If I had room left in my craft room for more storage, this would be perfect and hold lots of supplies.
It is so useful! I’d like to make another one.
Paula
I love this project and it’s perfect for a small home, or any size home! And you can paint or stain it any color! Thanks for sharing at Tuesday Turn About… I’ll be featuring your post, dear friend, at this week’s party!
Wow! I love this idea for storage of my crafting items! Pinning
Have a great day,
Kippi
Thank you, Kippi! This is such a handy item to store most anything.
Paula
I love this! I love using crates in my home. We have crate shelving in my pantry and master bedroom, and my daughters have crate nightstands!