DIY Farmhouse Style Tray
A tray is not only decorative, but also useful. On a coffee table, they can corral magazines and remotes. On a table, they can be base of a centerpiece or seasonal vignette. And of course, they are good for their intended purpose, to transport items from place to place. For this month’s Power Tool Challenge Team project, we are all making trays. It’s going to be fun to see what everyone created. You’ll find links to the trays that my friends made at the end of this post.
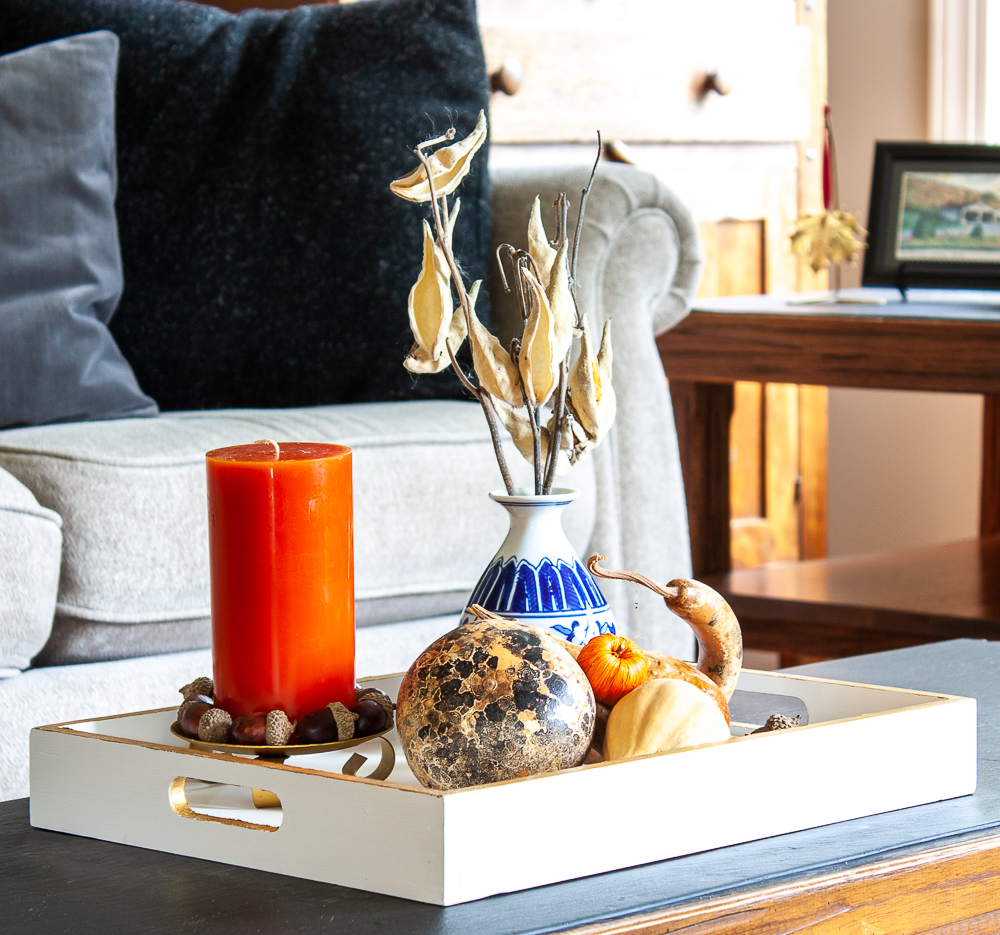
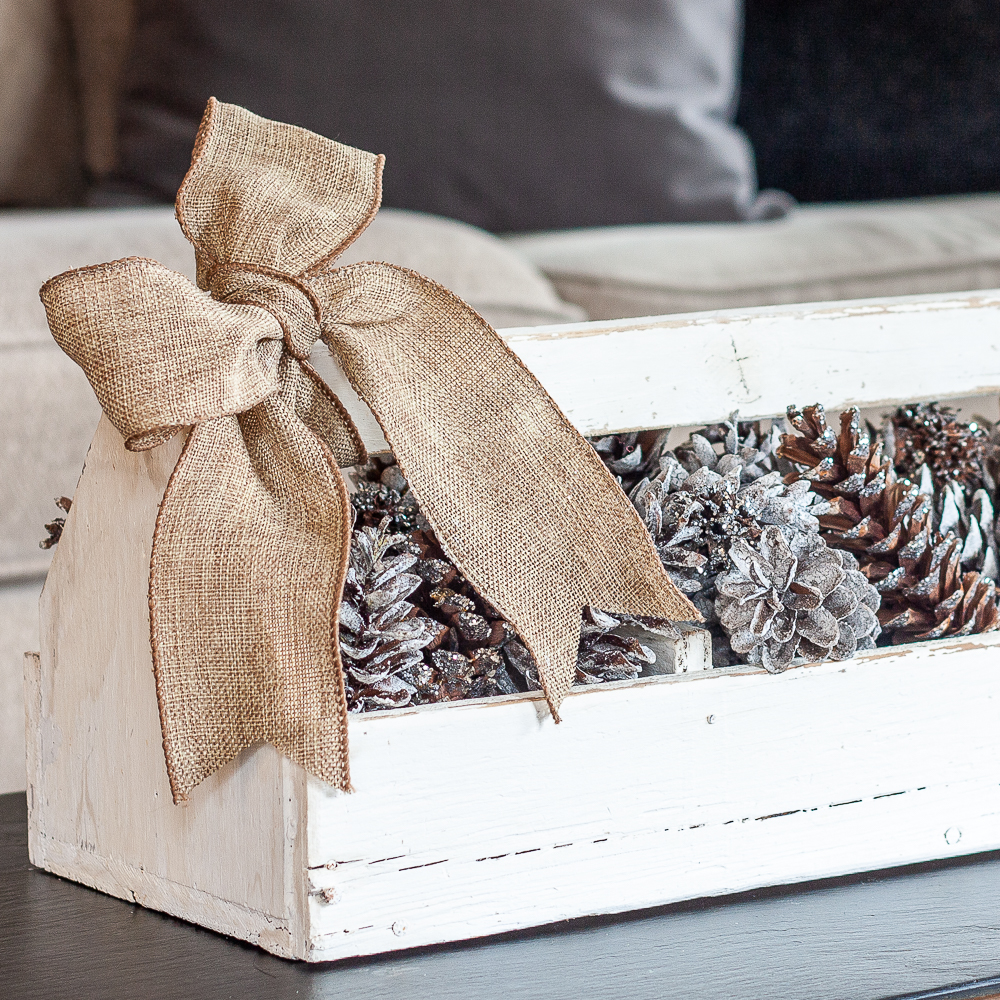
I love the DIY Farmhouse Style Tray that I created and it’s going to be fun to use in my décor in any season.

This farmhouse tray is large measuring in at 2’ x 16 3/4”. I really love the look that the Weathered Oak stain gave the new Poplar used to construct it.

Decorative banding added to each corner gives this new piece an old look.

This tray is ready to decorate my coffee table for spring.

My aunt passed along this Blenko vase that belonged to my grandmother to me at Christmas. This is the first time I’ve had an opportunity to use it. It looks pretty filled with Viburnum cutting from my yard.

Now let me show you how I made this tray. Be sure to check out the trays that my friends made by clicking the links at the end of this post.
How to Make a DIY Wood Tray
Materials
1 Sheet Birch Plywood – 1/8” x 2 ft x 2 ft
2 Poplar Project Boards – 1/2” x 4” x 4 ft
8 Right Angle Metal Corner Brackets (Decorative)
Minwax Pre-Stain Wood Conditioner
Minwax Wood Finish in Weathered Oak
Wood Glue (We like Tightbond)
Router Bits: 3/8” x 1/2” Rabbeting Bit and 1/4” Roundover Bit
Clamps (our favorite) and Pipe Clamps
Clamping Squares – We use these for nearly every woodworking project that we do!
Circular Saw
Router
Sliding Compound Miter Saw
Dremel Rotary Tool
Drill Press
Jigsaw
Orbital Sander
This project cost just about $44 to make. I had to purchase the wood, decorative corners, wood conditioner, and the wood stain. The lumber cost was about $18. 
Procedure
Make the Sides of the Tray
The sides of the tray are made from two 1/2” x 4” x 4 ft Poplar project boards. The long sides were cut at 24” each and the short sides at 16-3/4” each.
I wanted the bottom of the tray to fit into the wood, so I used a 3/8” x 1/2” Rabbeting Bit to cut a groove in the sides and end boards.
Since I intended to butt joint the tray ends (handle side) to the long sides of the tray, I routed rabbets the entire length of the long sides, but had to rabbet only the interior edges of short sides. The rabbet depth was approximately 1/8” deep. See photos below.
A routing table is a handy tool to have for projects like this.

This is the groove cut on the two side pieces.

Here you can see how the bottom of the tray is flush with the sides thanks to the routed groove.

The two end pieces were also routed but with 3/8” left unrouted on each end so that the rabbet is not visible when the short sides are glued to the ends of the long sides.

The router bit left rounded edges that needed to be squared off so that the tray would fit into the groove A Dremel was used to make a straight cut and then the excess wood was chipped out with a chisel.

You can see the cut the Dremel made here and then the pencil line indicates where the wood was removed. A sharp razor knife would also probably do the same as the Dremel tool, if you are careful.

Here you see the end pieces now have a squared off groove so that the bottom will seat properly when the tray is constructed.

Make the Handles
Measure the center of each end piece and mark with a pencil. A center finding ruler makes this a snap!

Each handle is 3 1/2” wide and is formed by using a 1 3/8” Forstner bit, a drill press, and then a jigsaw. I measured down 1/2’ and then marked off where each Forstner bit hole would be drilled.

Use a drill or drill press to make two holes for the sides of the handle.

Mark lines to cut to form the rest of the handle.
Use a jigsaw to cut on the lines to form the handles.

Attach a 1/4” Roundover bit to the router and route each side of the handle.

Make the Bottom of the Tray
Use the 1/8” x 2 ft x 2 ft sheet of Birch plywood to make the bottom of the tray. Since the bottom is to be rabbeted into the tray sides, the bottom dimensions have to include the depth of the rabbet on each side of the tray sides. Additionally, the short pieces of the end tray are butt joined to the long pieces of the tray. The dimensions of the bottom plywood panel were determined by measurement after the sides were dry fitted together. Once the bottom dimensions were determined I used a carpenter’s square to draw a line at at the appropriate measurement and then made the cut using a circular saw.

Sand
Sand all of the pieces with an orbital sander.

Construct the Sides of the Tray
Glue the side and end pieces together. Use clamping squares in the corners with clamps to insure that all corners are square. Use pipe clamps to hold everything in place while the glue dries. A woodshop cannot have enough clamps on hand.

The Tray Unfinished with the Bottom Not Attached
Here the tray is unfinished and the bottom isn’t attached but you can see that it fits into place.

Bottom View

Stain the Tray
I didn’t have a stain color in my stock pile that I wanted to use on this tray, so I went shopping at Home Depot for a new color. I purchased Pre-Stain Wood Conditioner to use before staining and Weathered Oak stain. The sample boards in the stain section sold me on Weathered Oak; I liked how the stain made the wood look old barn wood.

Attach the Tray Bottom and Add the Decorative Brackets to the Sides
I attached the bottom of the tray to the sides with glue and brad nails. Felt pads will protect table surfaces from being scratched.

Decorative brackets were added and the tray was complete.

This tray has already made it’s way to the lake where when not used as décor, will be immensely useful for carrying food from the kitchen to the dock.

If you like this project, please pin it for others to discover.


Now it’s time to enjoy the trays that my friends made. Click on the link below to visit each project.

Designed Décor – DIY Serving Tray
Interior Frugalista – DIY Farmhouse Tray
H2OBungalow – Coastal Rope Handle Tray Tutorial
Virginia Sweet Pea – DIY Farmhouse Style Tray
My Repurposed Life – DIY Tray Using Metal Tiles
My Love 2 Create – DIY Chalkboard Serving Tray
Create And Babble – DIY Wooden Quilt Square Tray
The Kim Six Fix – Easy Hexagonal Tray
Domestically Speaking – DIY Coastal Tray

Wow Paula, your woodworking skills are impressive! Love the rustic charm of this tray and the decorative metal brackets are such a great touch.
Thank you, Marie! We are really going to enjoy using this at the lake.
Beautiful tray! I’m impressed with your collection of tools too.
Thank you, Wendy. The tools certainly have collected over the years.
I love this tray. I especially love the corner brackets. What a clever idea!
I was really happy that I thought about adding corner brackets and that I planned ahead enough to get them in time to use them. All of the trays this month were great.
I love this tray! I love how you cut out the wood for the handles! I am going to have to try this whenever I build another tray! The metal corner details are perfect!
The wood cut out handles make it easy to carry this tray. I am planning to load it with food to carry back and forth between the kitchen and our dock this summer at the lake. I also like the corner brackets and am glad that I thought to add them.
I love your farmhouse tray Paula! Your stain choice and those corners are perfect and I really like that you routed the edges for assembly. You are so right about having enough clamps – I need to add more to my workshop and appreciate your advice on which ones to get.
Love the weathered oak stain… so pretty!
This is so neat! I love that you built it from scratch! 🙂
I’d like to invite you to share this at the Farmhouse Friday link party. I will share it with a direct link back to your post on all my social media, including on the DIY Farmhouse Style Facebook group. The link party opens Friday morning at 6am PST. I hope to see you there! 🙂
Paula, you amaze me. This tray is just gorgeous! You outdid yourself here. Those little metal bands on the corners are the perfect finishing touch! And of course your tutorial is just the best.
Thanks for sharing this at the Grace at Home party. I’m featuring you this week!
Thank you, Richella! Making the tray was fun and every time I do a woodworking project, I learn something new.
Paula, you did such an amazing job on this tray and the colour is so perfect too!!
Thank you for sharing on Create, Bake, Grow & Gather this week. I’m delighted to be featuring your tray at tonight’s party.
Hugs, Kerryanne
I really like it! I haven’t done much woodworking, maybe my husband will make it for me!
I hope he will! I’m really enjoying this tray.
I admire your woodworking skills. Thanks for the detailed tutorial. The tray is large and study enough to serve many purposes. I like the banding around the corners — Looks a bit like hinges. What a nice finished product!
Thank you! I’m loving this tray and know I’ll use it for both decorating and toting things around.
Thank you so much for sharing this at the Farmhouse Friday link party! Shared and pinned! 🙂
Your tray turned out beautifully, Paula! Thanks so much for sharing at Project Inspired.
I hope all is well – you’ve been in my prayers. xoxo
Hi Paula,
I couldn’t pass by this post on today’s Farmhouse Friday Party. I love tray vignettes and , lazy me, just posted about a tray and accessories I bought to make one yesterday at Target. Now I guess I’d better learn to make my own! Thanks for the tutorial. I’ve added your blog to my sidebar so I can follow your future posts. TGIF, Cheryl
Thanks so much for adding me to your sidebar, Cheryl! I love this tray and have really enjoy using it.
Paula
This is a great tutorial and the tray looks fantastic.
Thank you so much! I so much enjoy using this tray.
Paula
Love the tray, Paula, especially the decorative corners! I saw an unfinished tray on Amazon, so I may need to make a cheater’s version 😉
Wow. You did a great job on this! #WWBlogHop
I love your tray! I am totally envious but impressed with your power tool skills! Featuring you today at TFT. Hope you will come back and party with us this week!
https://followtheyellowbrickhome.com/vintage-french-farmhouse-style-at-thursday-favorite-things/
This turned out awesome and it’s a great tutorial. Thanks for sharing it with us at the Waste Not Wednesday link party. Can’t wait to see what you’re up to this week.
What a beautiful project! I’m super jealous of your woodworking skills. Thanks for stopping by and linking with Throwback Thursday!
Thanks, Shelly! My husband has the skills and I end up being the helper!
Paula
Hi Paula love the tray came out great
So glad I saw this on FB… I’ve never seen this post! What a lovely tray! You and hubs did a great job! It’s a lovely diy farmhouse tray!