How to Make a Christmas Cut Out DIY Wooden Candle Holder
Did you know that it isn’t terribly hard to make a DIY wooden candle holder? I made several versions for Christmas and I can’t pick a favorite!
I’m sharing my DIY Wooden Candle Holders for this month’s Thrifty Style Team project hosted by Julie of Redhead Can Decorate.

You’ll find links to all of the projects shared this month at the end of this post.
DIY Wooden Candle Holder
For this month’s Thrifty Style Team project, the theme is a Christmas DIY. I decided to make a DIY Wooden candle holder and had so much fun making several versions.
For two of the candle holders that I made, I used an upcycled table leg. For the other candle holders, I used wood from Home Depot.
I love what I created and I can’t wait to use these in my Christmas decor!
Upcycled Furniture Leg Wooden Candle Holder
When I decided to make a wooden candle holder, Mr. SP and I headed to the workshop to get started.
We didn’t have any wood that was the correct size, so I started poking around to see if there was anything in our stash that could possibly work.
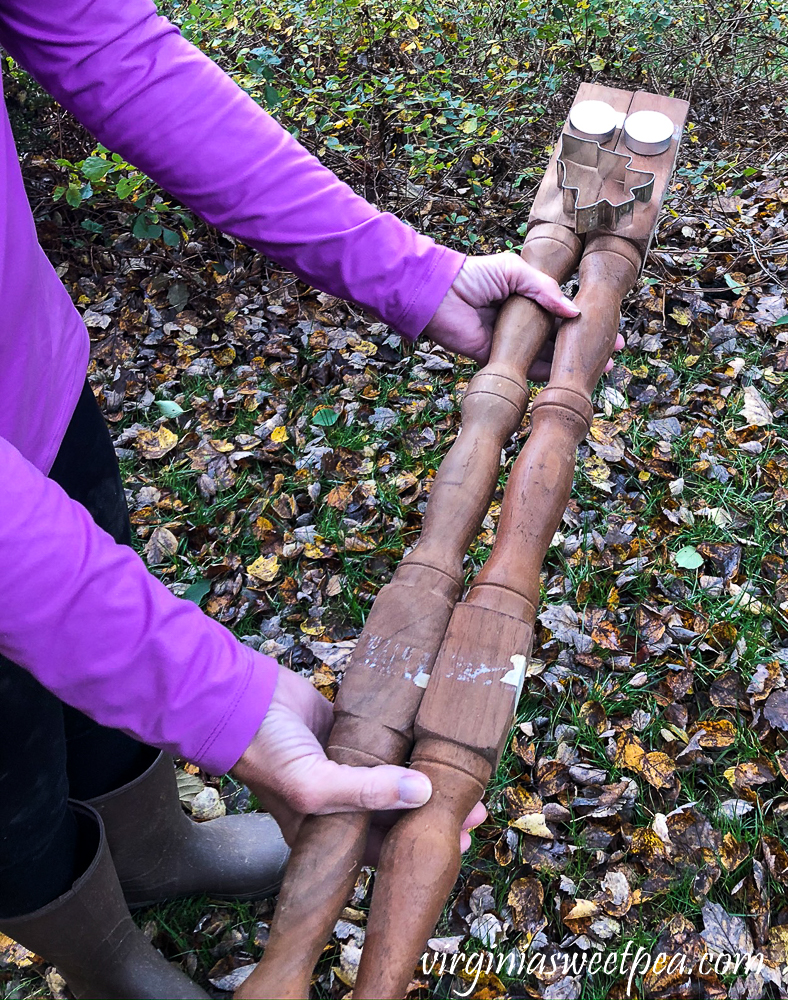
Buried in a corner of the workshop, I spotted a bushel basket filled with furniture legs that my grandfather made by hand years ago. Mr. SP rescued these from Granddaddy’s shed after he died.
We decided that the ends of two furniture legs were the perfect size for this project.
Don’t worry if you don’t have furniture legs, later in this post I’ll share how I made other wood candleholders using new wood.
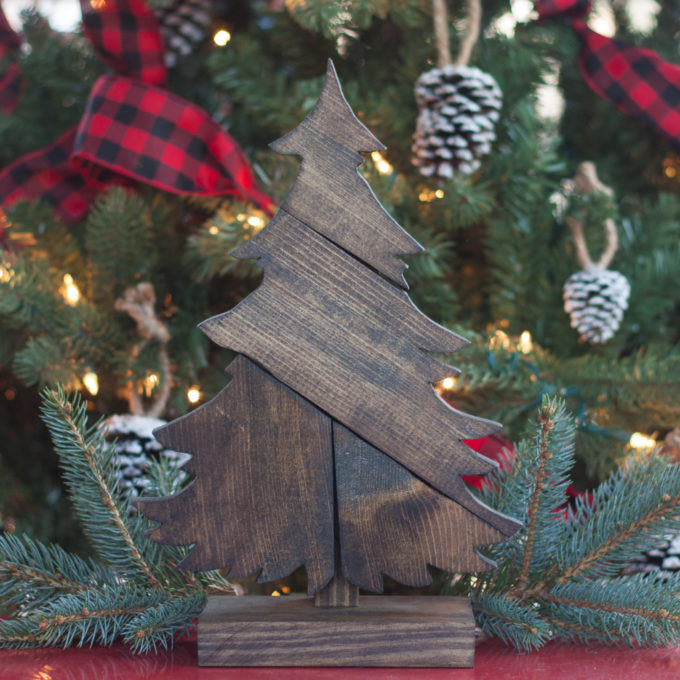
Tree Candle Holder
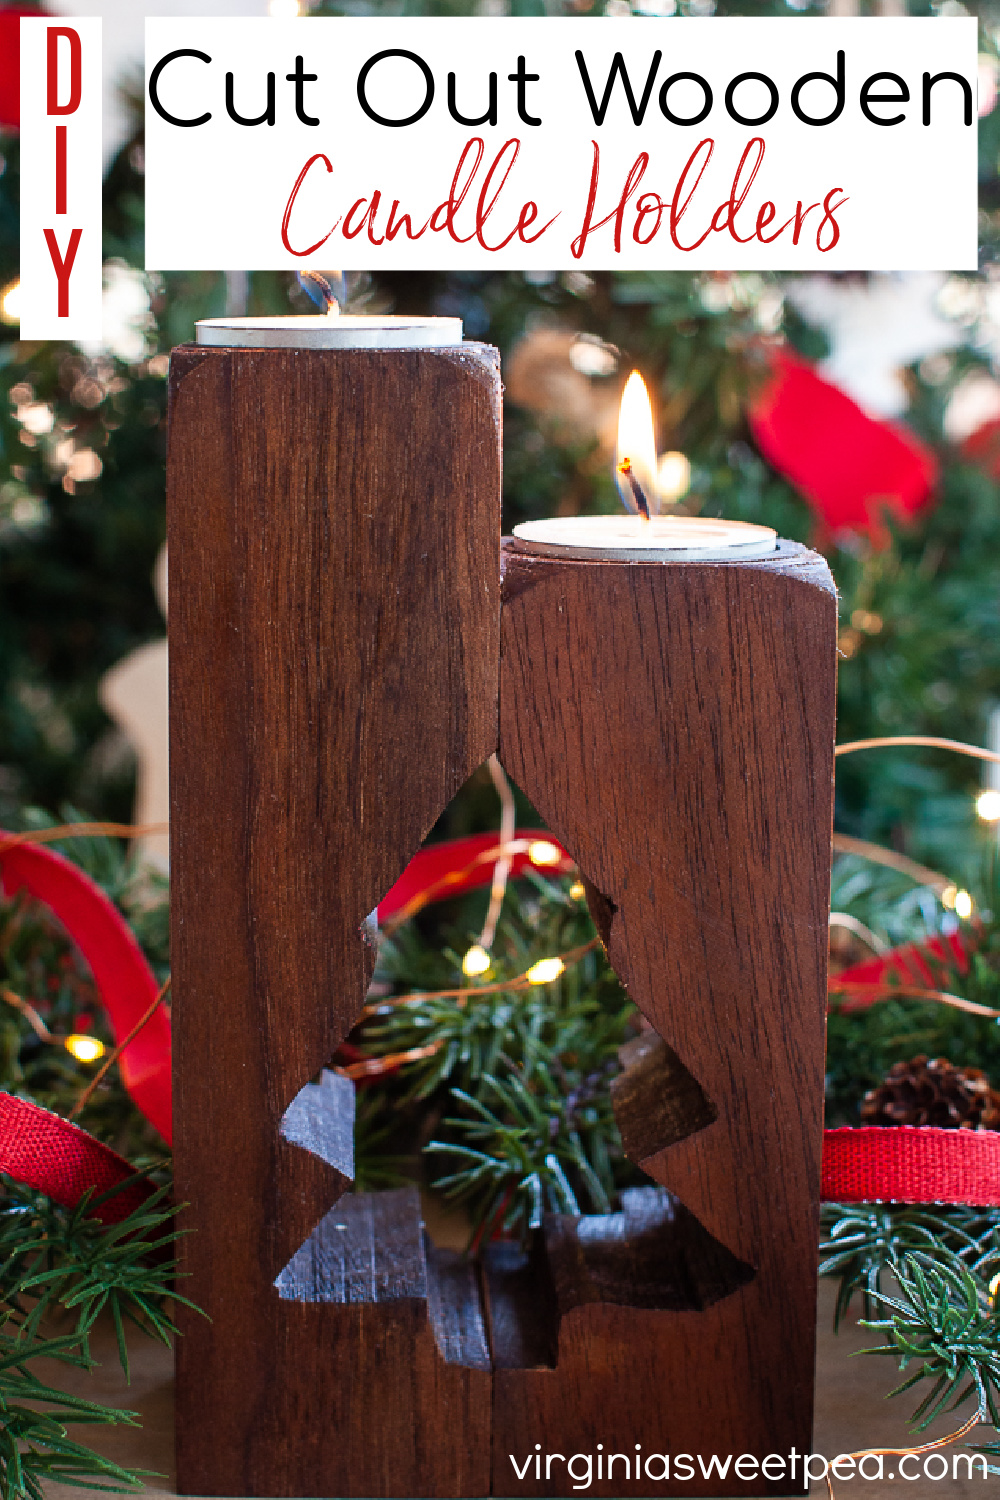
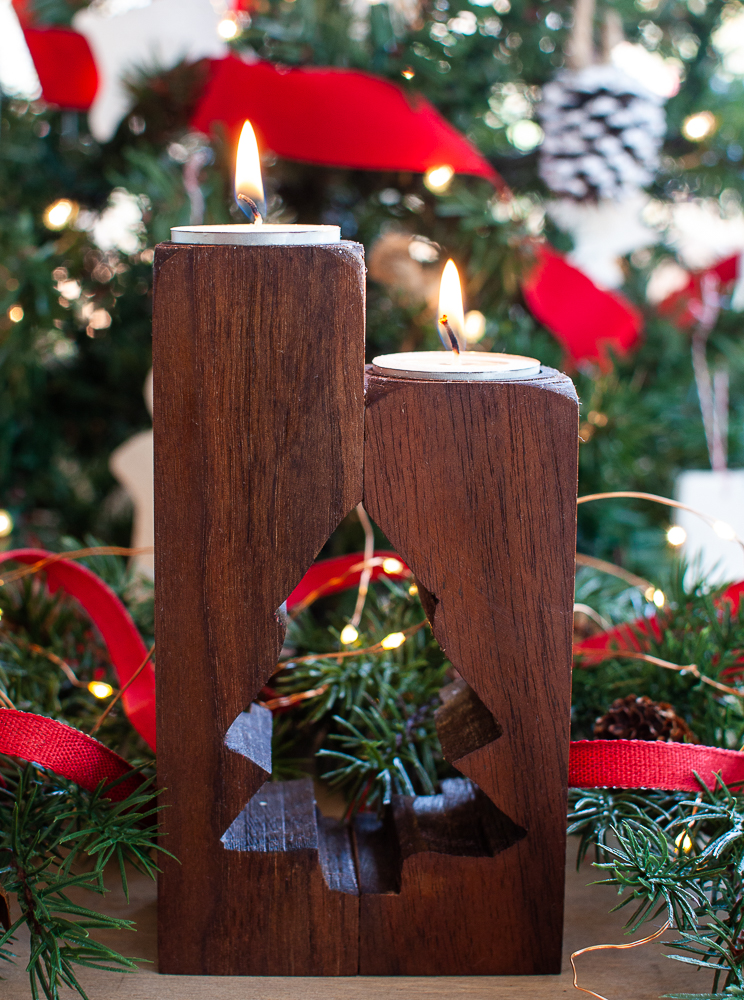
The first candle holder that we made with the furniture legs was a tree candle holder.
The furniture legs are Walnut and the grain of the wood is gorgeous.
How to Make a Tree Candle Holder
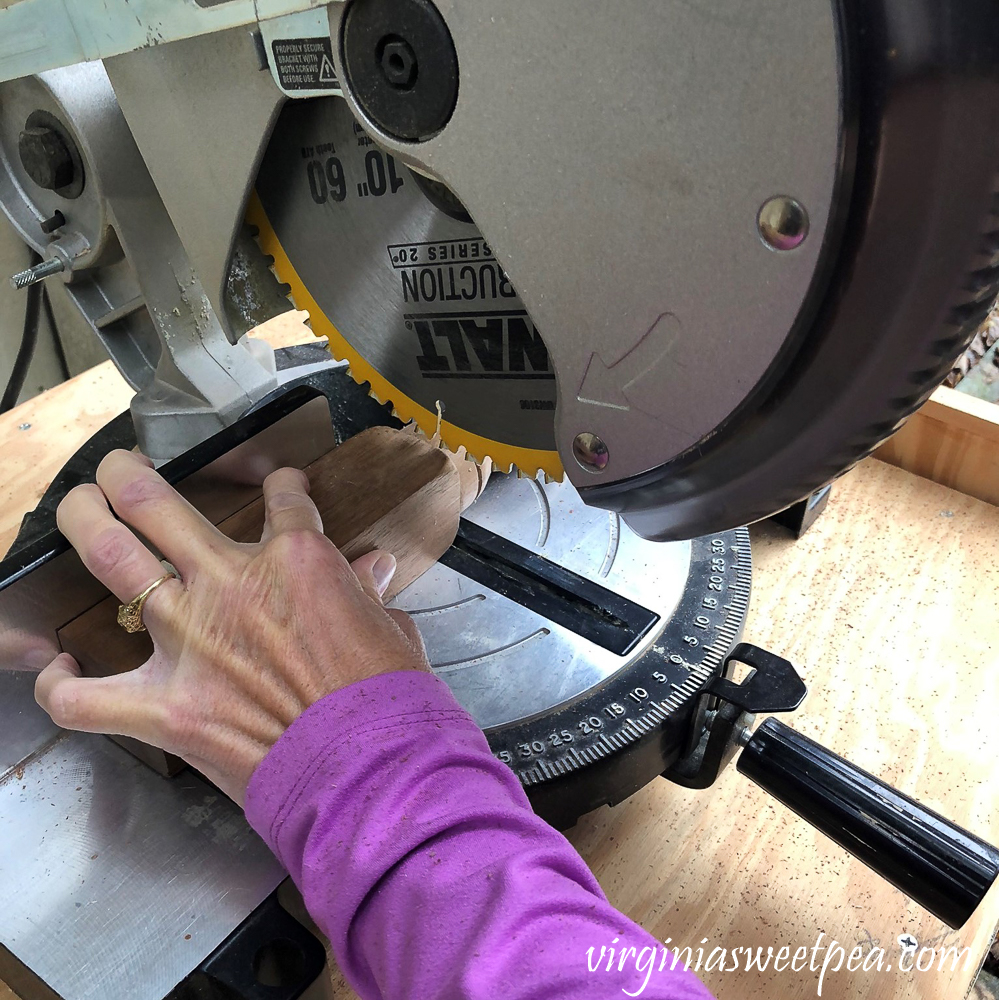
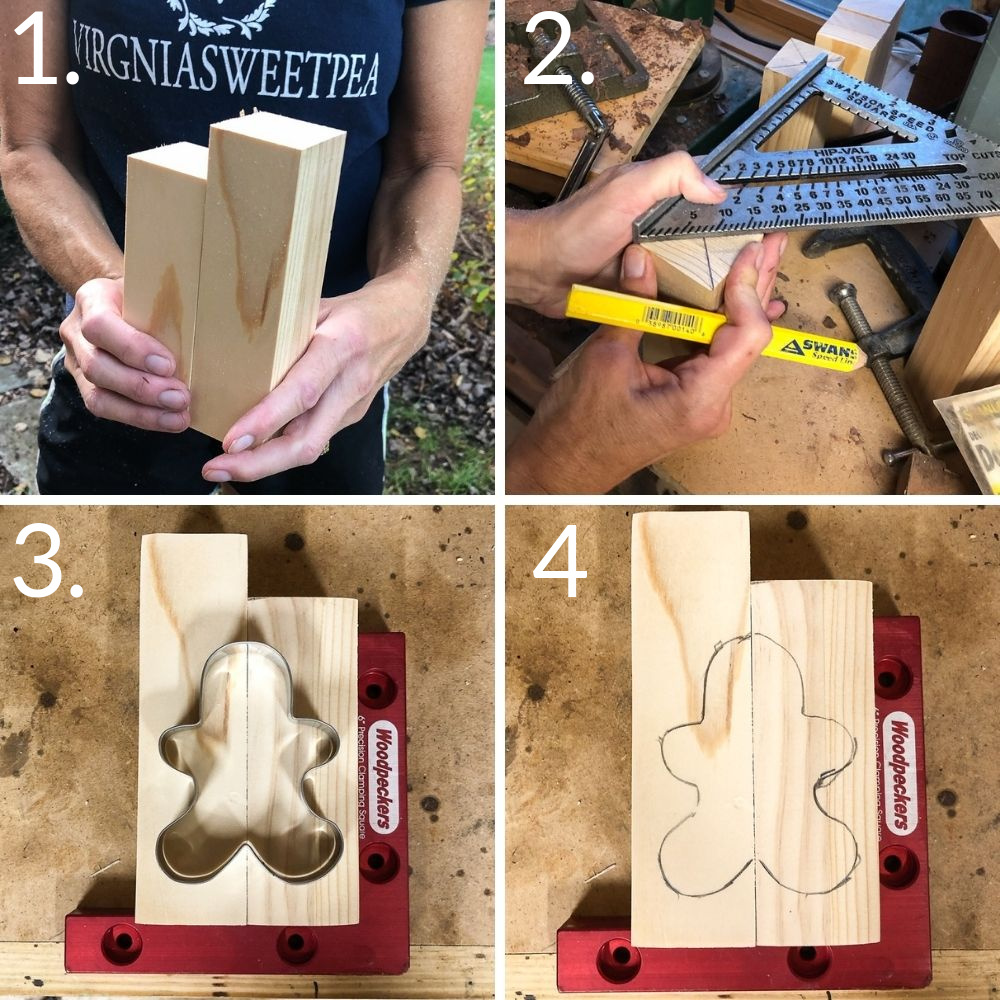
The first step to make the candle holder was to cut off the sections of the furniture legs that we wanted to use.
A chop saw made quick work of this.
Then we followed these steps:
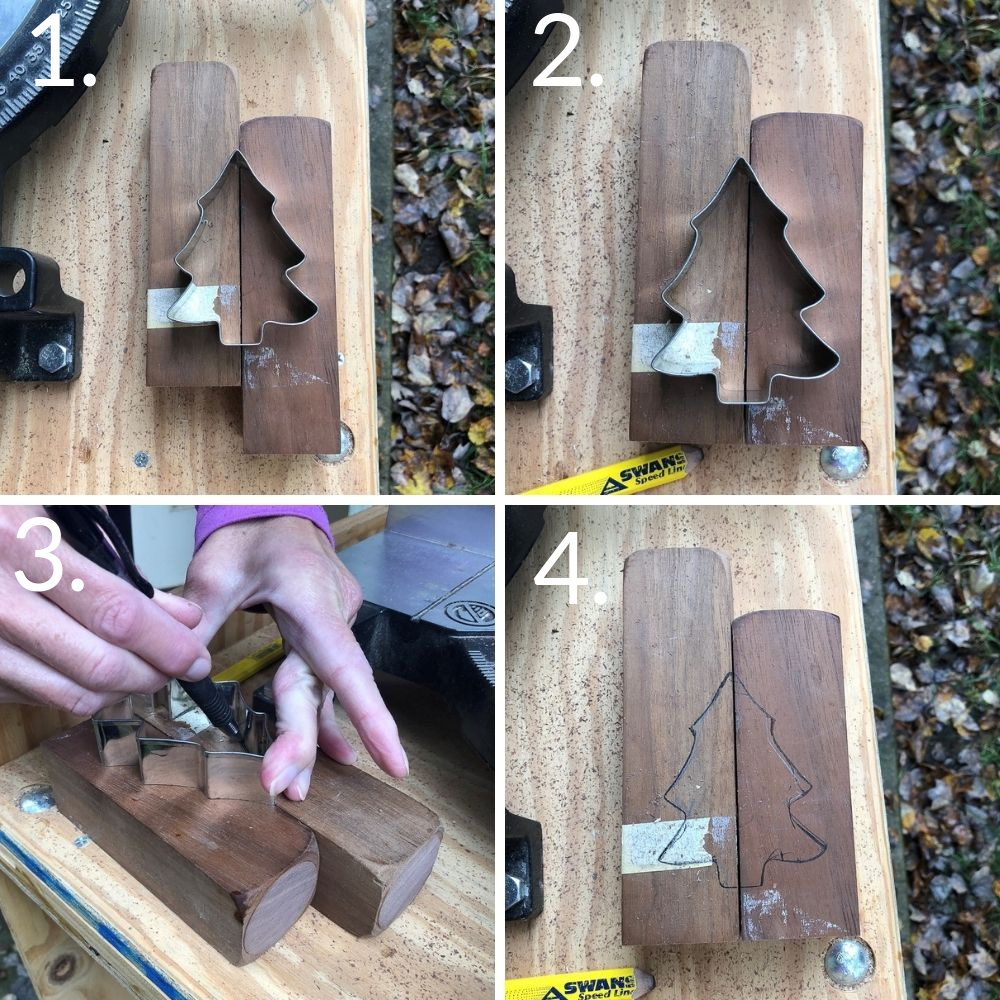
- Determine the length of each piece of the candle holder. We chose 6 1/2″ x 5 1/4″. Cut pieces to this size.
- Use a 3.5″ Christmas tree cookie cutter as a pattern for the cutout section of the candle holder.
- Use a clamping square (shown later in this post) to make sure the wood pieces are square, then trace the Christmas tree onto the wood.
- The tree is ready to be cut out!
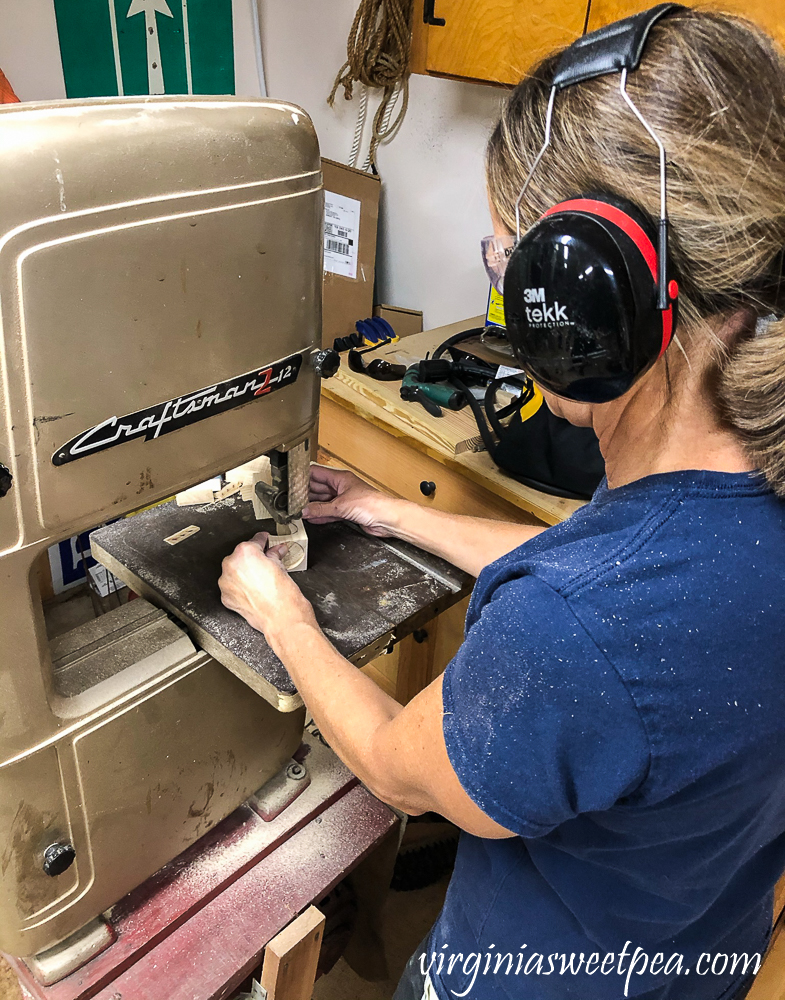
Cut out the Tree Shape
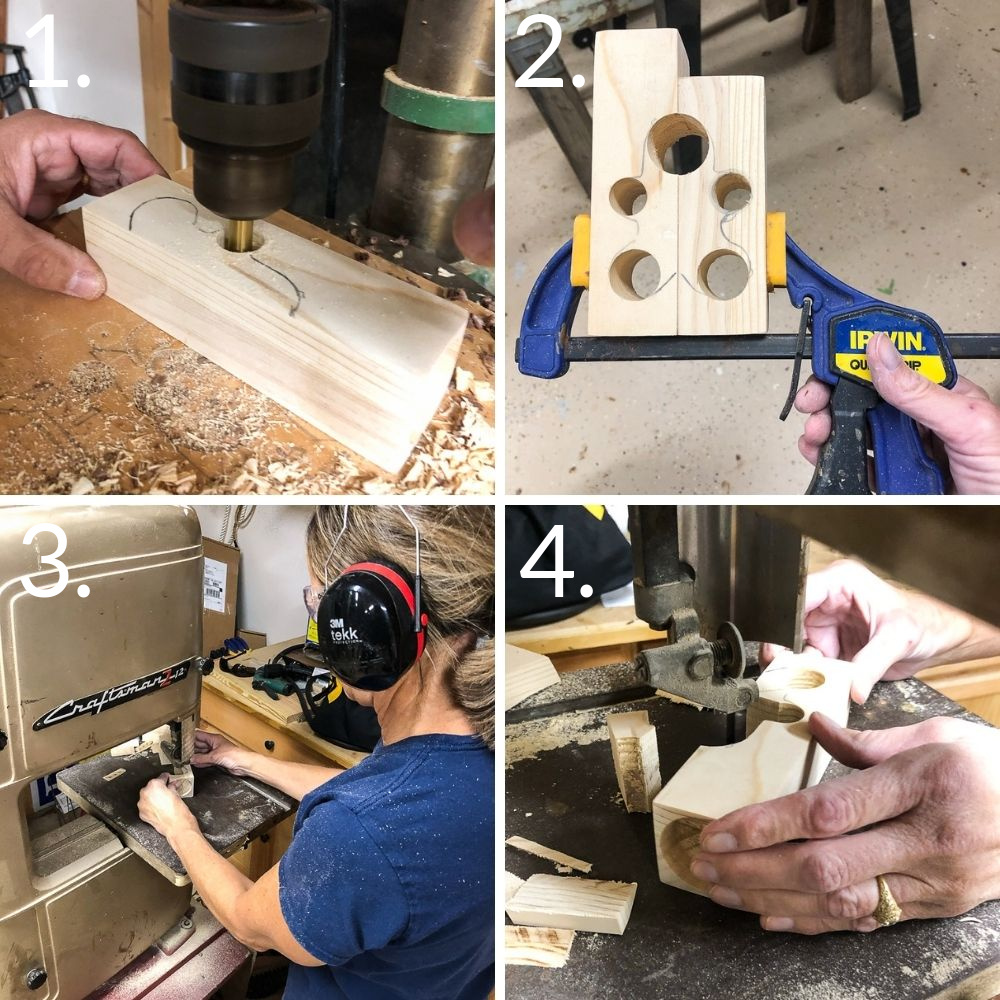
The next step is to cut out the tree with a bandsaw. Our modern bandsaw needs a new blade, so I had to use my granddad’s vintage Craftsman bandsaw.
I’m actually cutting out a gingerbread man here, but I wanted to show you this beast of a bandsaw!
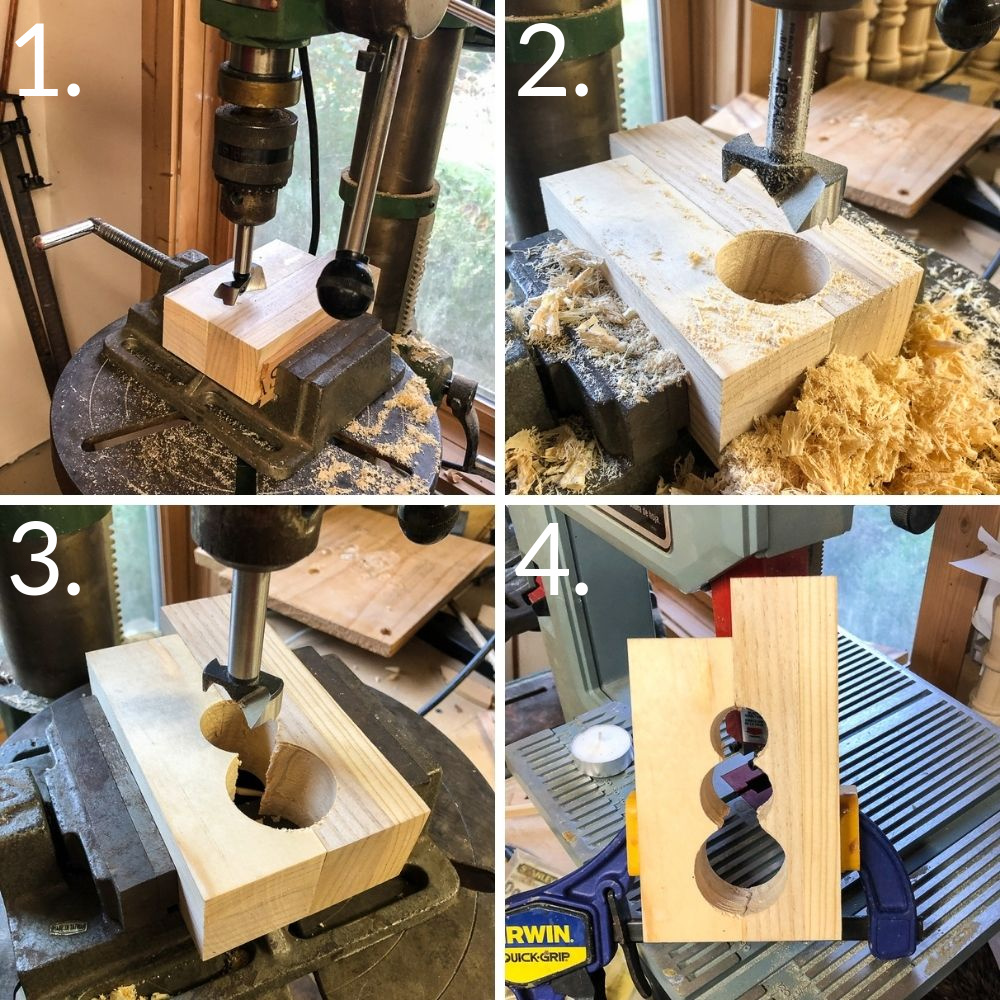
Add the Candle Holders to the Wood Pieces
Using a 1 1/2″ Forstner bit, make holes in the ends of the candle holder pieces to hold a tea light.
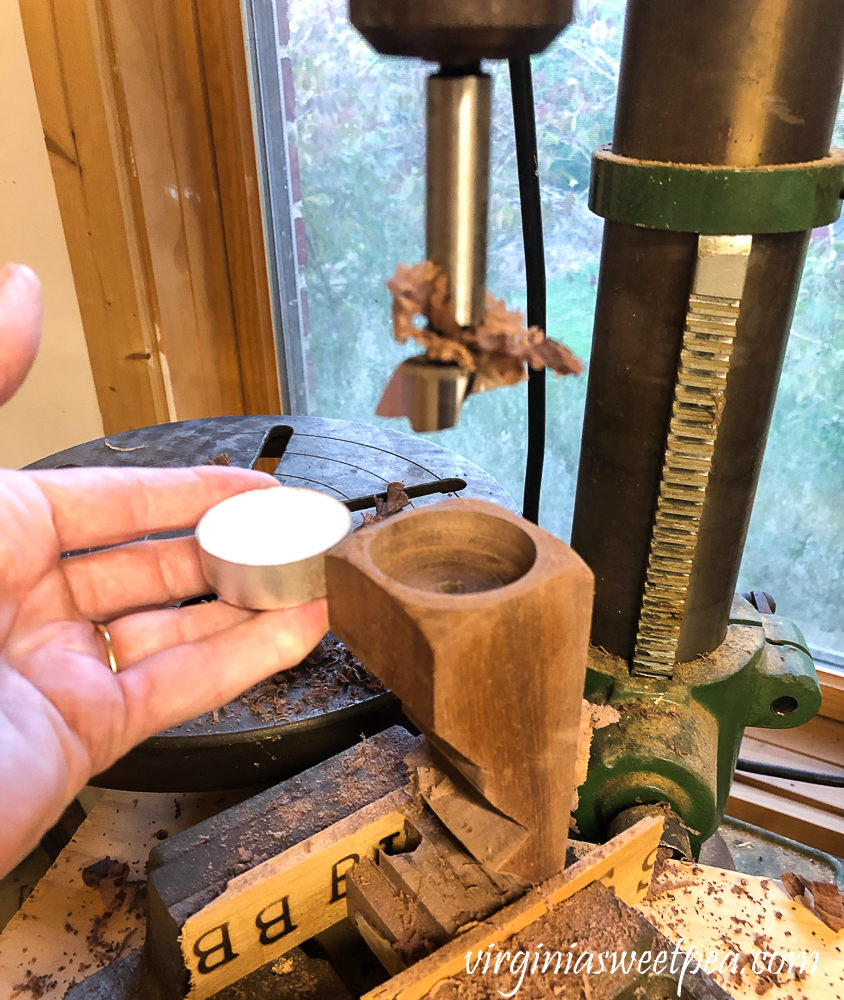
After the tea light candle holders were cut, I sanded both pieces.
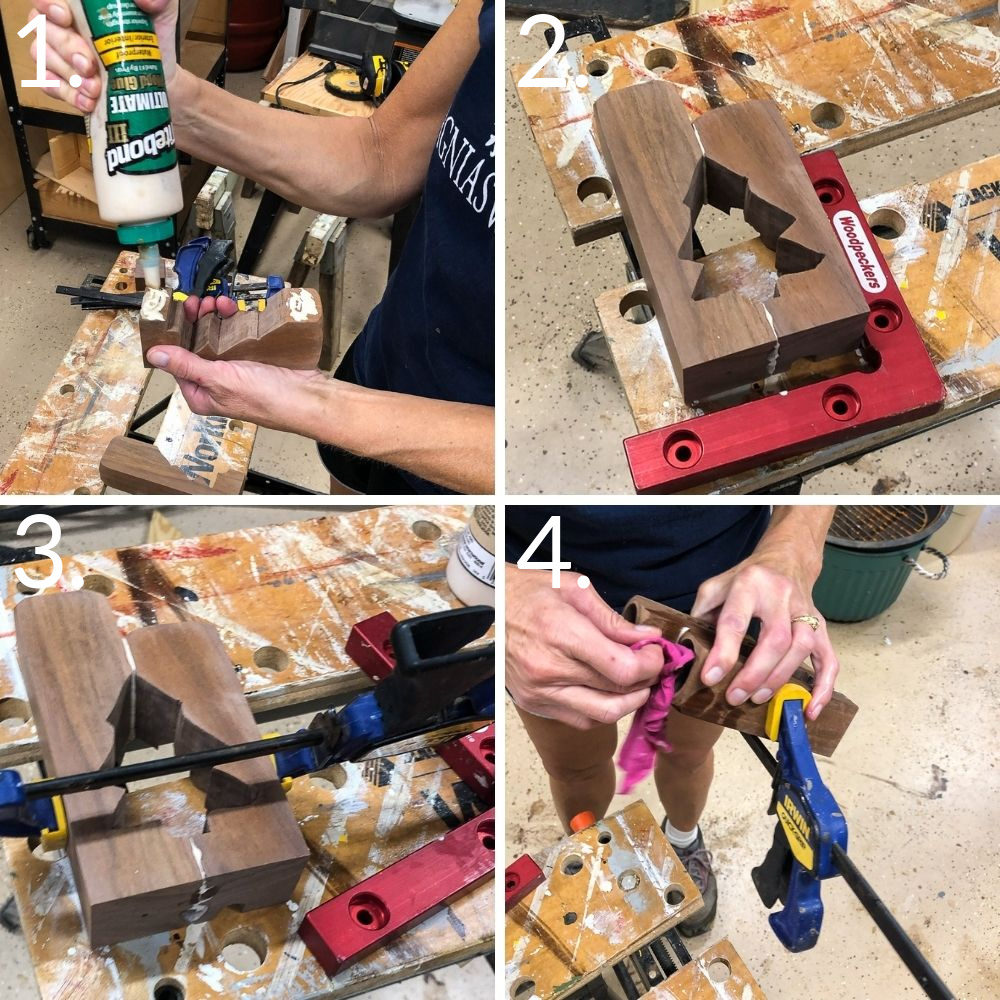
Assemble the Candle Holder
- Glue the two candle holder pieces together. We use Titebond wood glue for all of our projects.
- Use a clamping square to make sure the two candle pieces are square.
- Clamp into place. We prefer Irwin Quick-Grip Clamps. You can never have enough of these in a workshop!
- Use a damp rag to wipe off the excess glue.
Stain the Candle Holder
After the glue was dry, I used Watco Danish Oil on the candle holder.
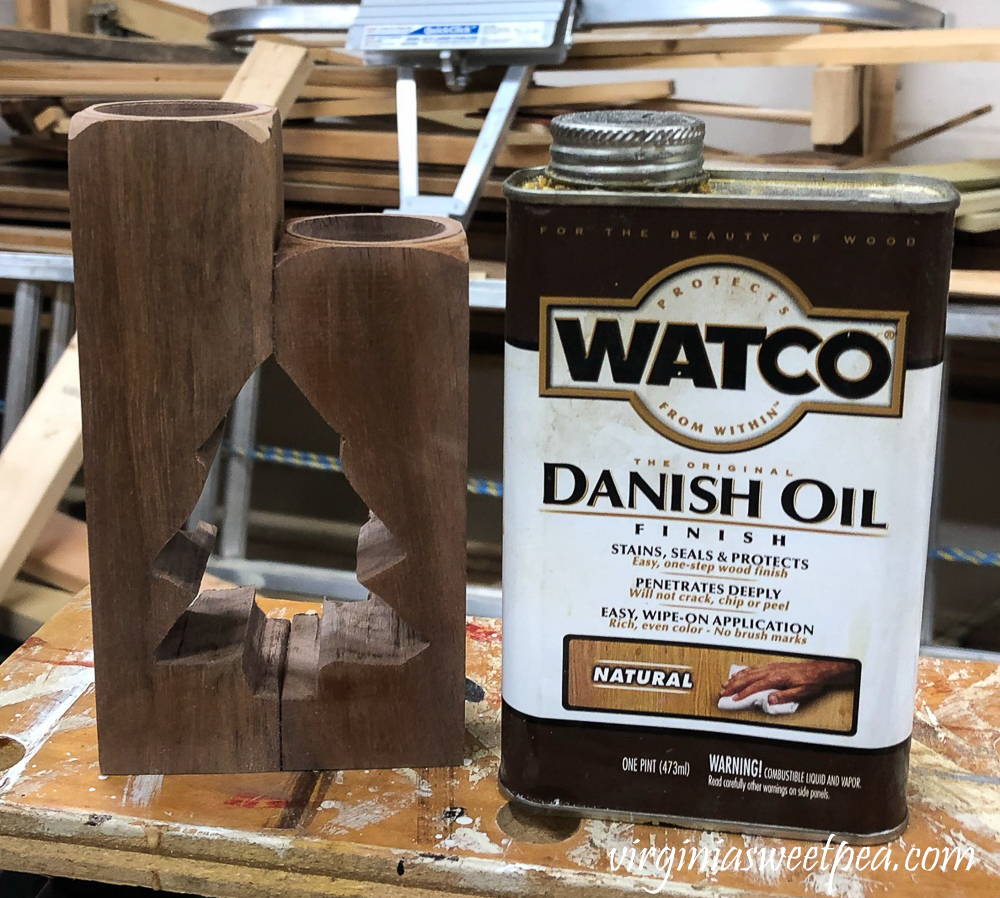
Danish oil really brings out the beautiful grain of the Walnut wood.
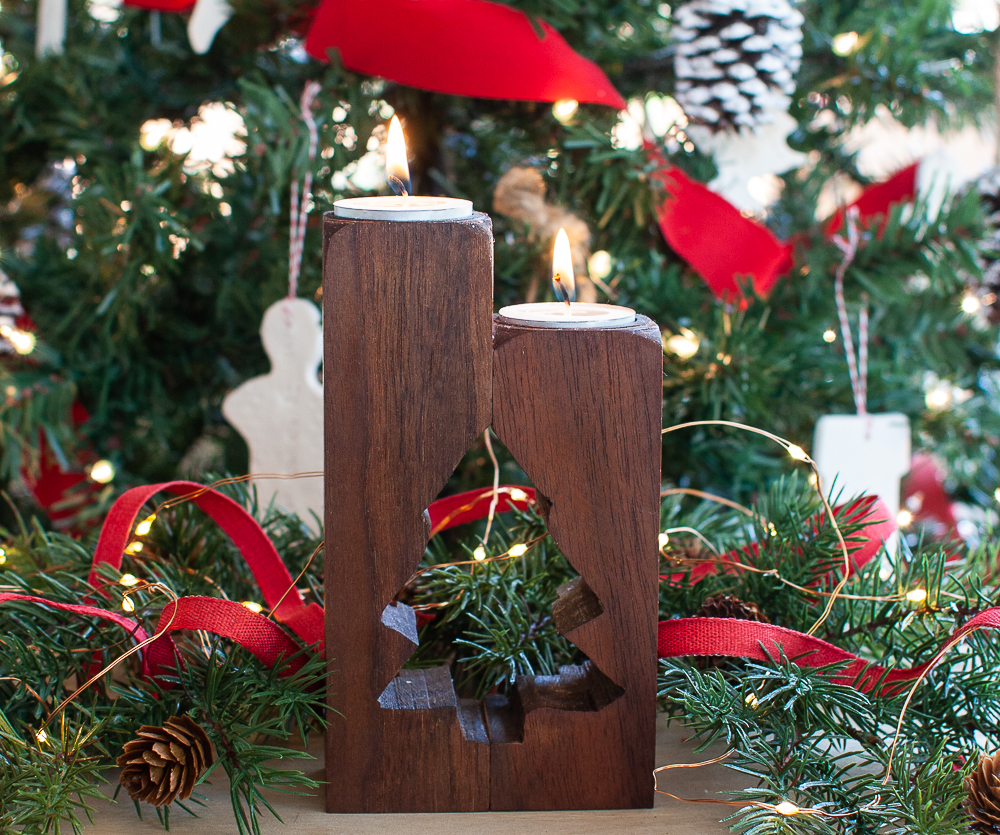
This candle holder is extra special since I used a furniture leg that my granddad turned. I think he would be pleased with what I created!
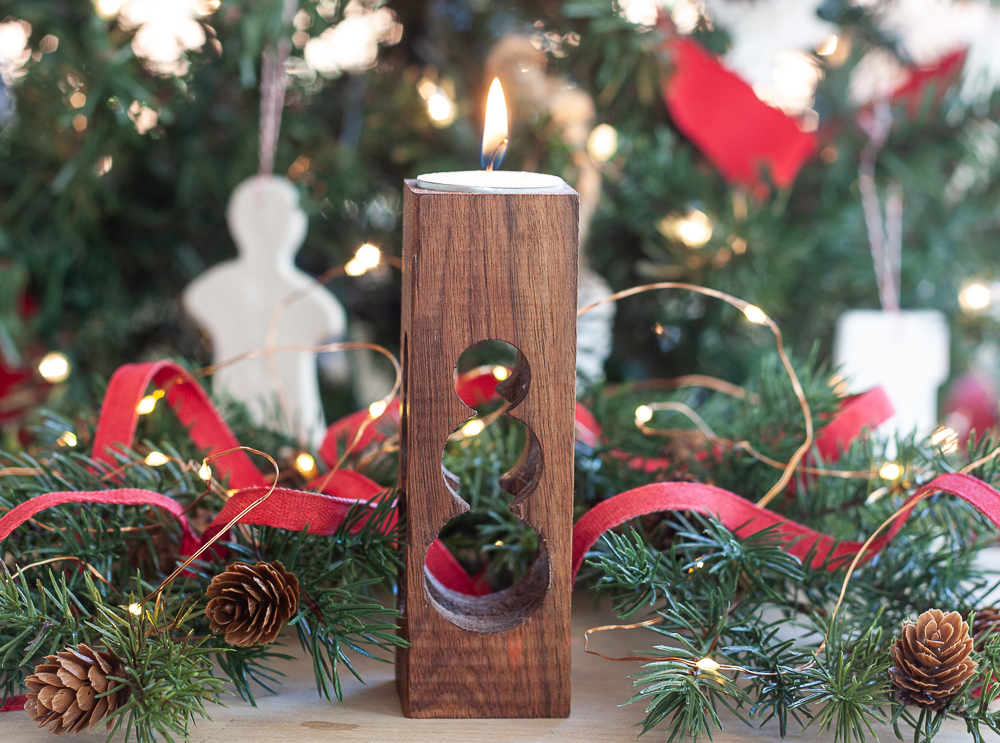
Snowman Candle Holder
While I was making the tree candle holder, Mr. SP used another section of the furniture leg to make a snowman candle holder.
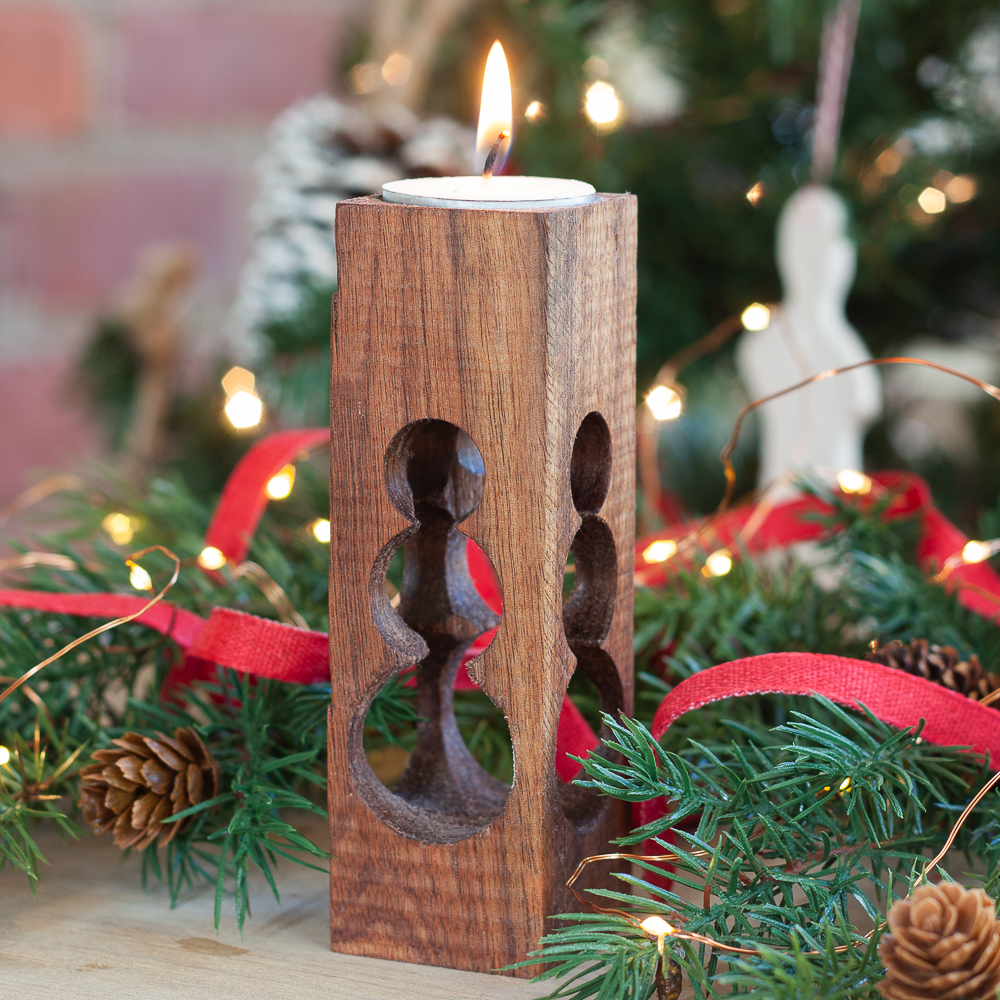
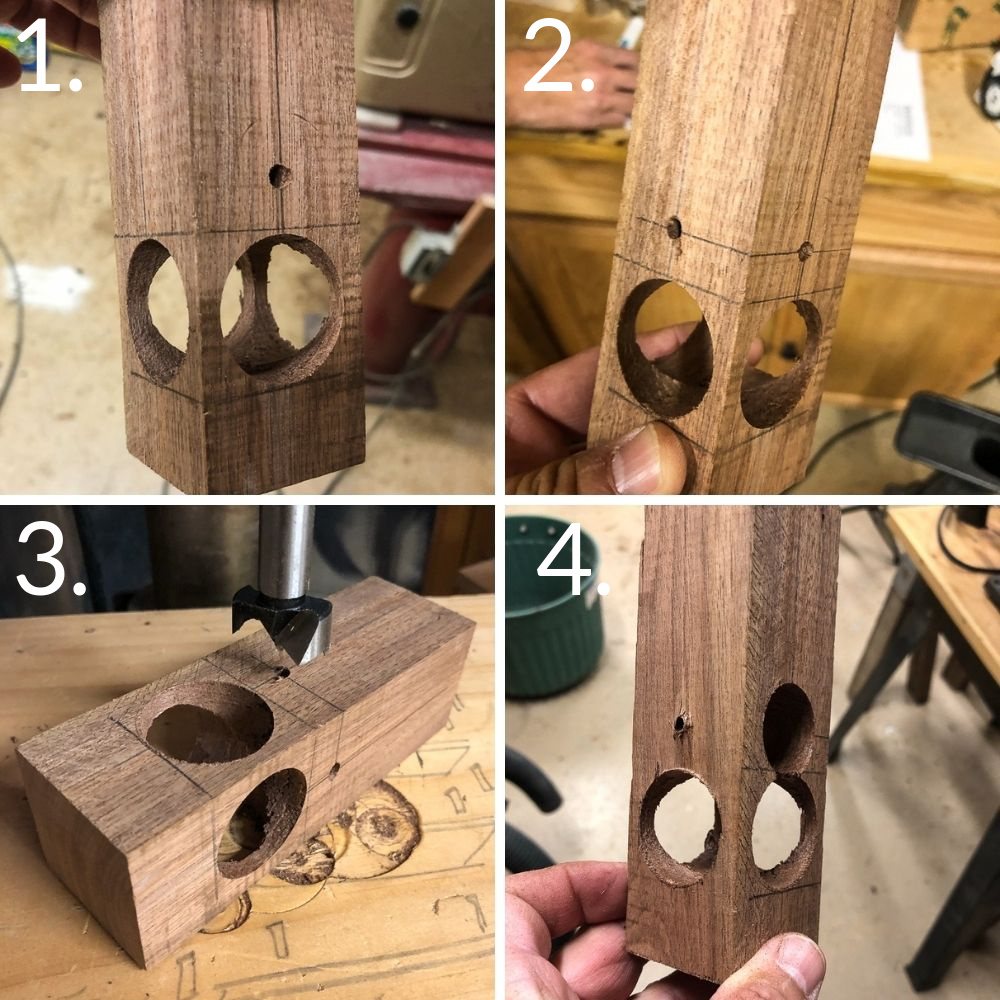
He first used a 1 1/2″ Forsner bit to drill the top to hold the candle.
To make the snowman, he followed these steps:
- Drill the snowman base from both sides with a 1 1/4″ Forstner bit in a drill press. So that the holes are correct position, a pilot hole was drilled through each side at the same elevation. Drill slowly.
- Use a 1″ Forstner bit for the middle section. Determine the middle section position so that the holes barely intersect. Mark the centerline elevation, then drill a pilot hole through the wood from both sides.
- Use this pilot hole to guide the Forstner bit. Be very careful while drilling with Forstner bits – especially on the middle and top sections of the snowman. They have a tendency to grab and spin the wood if it is not tightly held.
- One side had been drilled. Flip the wood, and drill the other side.
The head was cut using a 3/4″ Forstner bit. Repeat the steps described above.
I loved his idea!

After he made it, I sanded it with an orbital sander on the outside and then by hand on the inside snowman parts.
I used Watco Danish Oil to seal, protect, and bring out the beautiful Walnut grain on this candle holder as well.
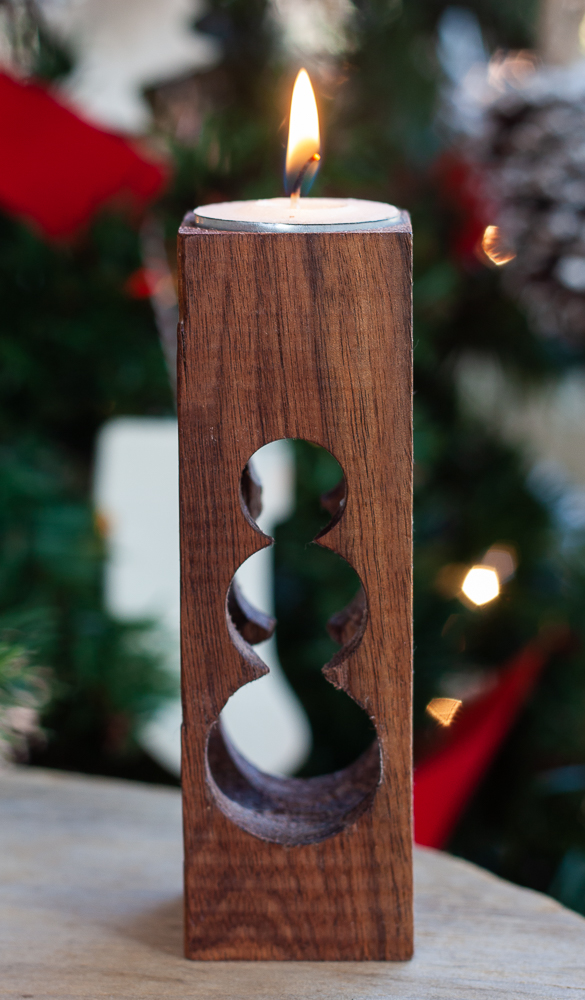
A snowman can be displayed all winter and I look forward to finding a special spot to use this for winter decor.
DIY Wooden Candle Holder with New Wood
We knew that not everyone would have a handmade Walnut table leg to use for this project, so we headed to Home Depot and purchased a 1 3/4″ x 1 3/4″ x 2′ piece of wood to make more candle holders.

We made three candle holders using this piece of wood.
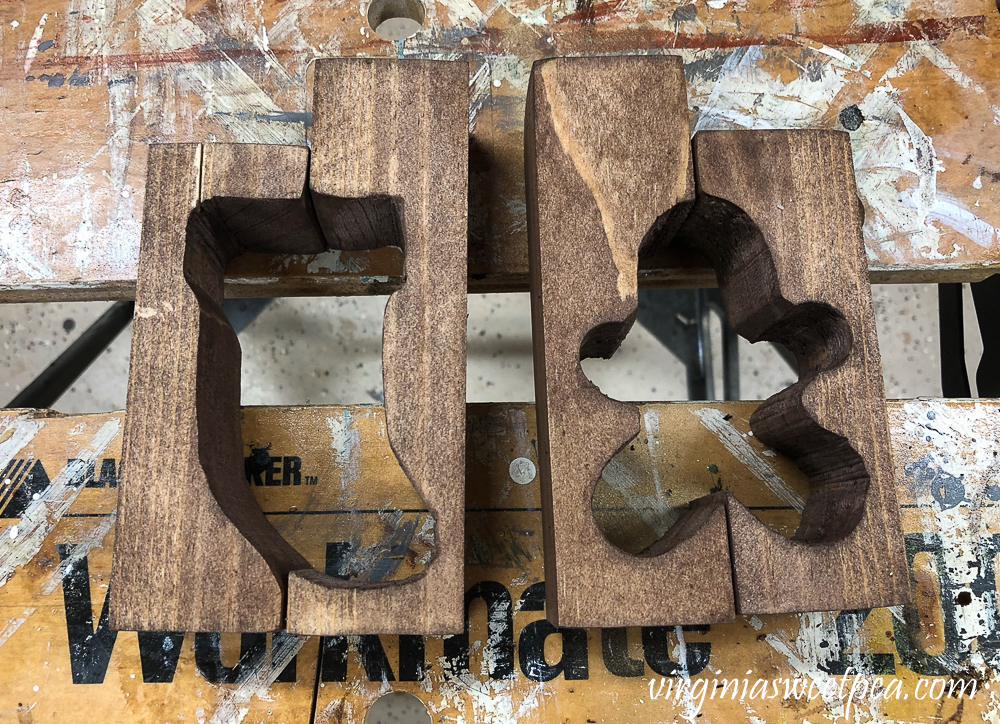
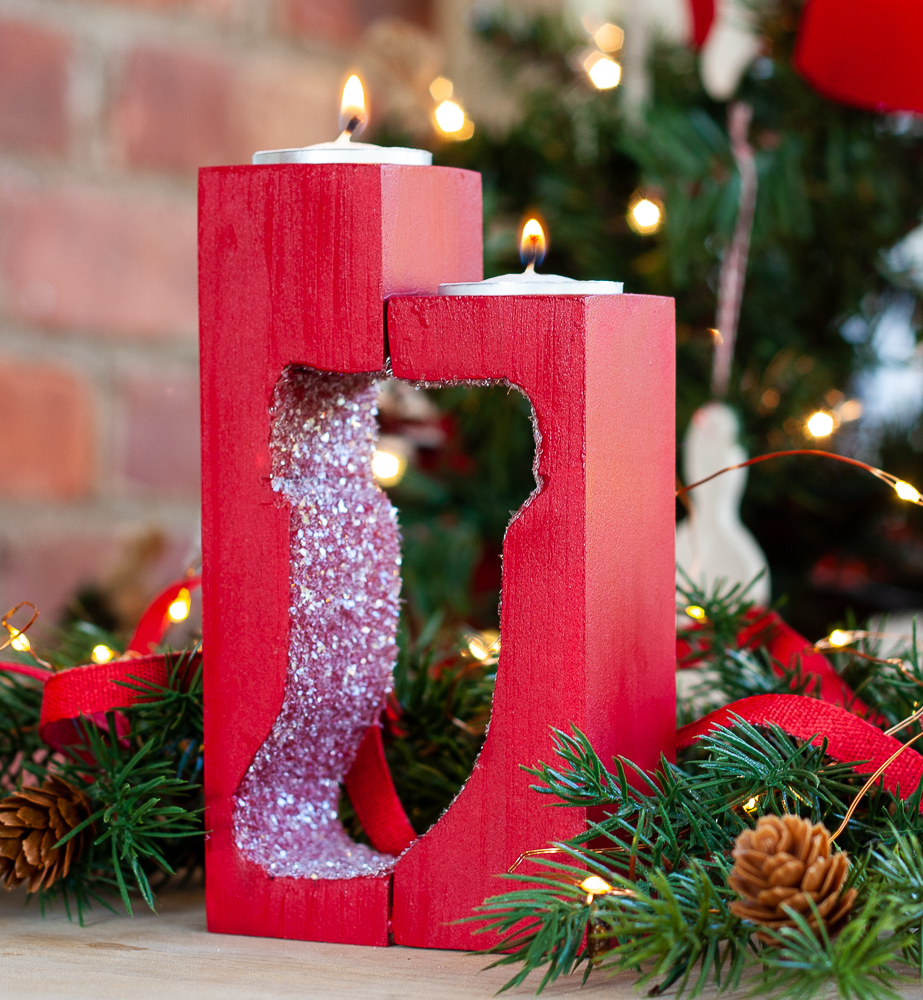
I love this colorful gingerbread man candle holder with glittered accents!

How to Make a Candle Holder with New Wood
- Cut wood pieces: 6 1/4″ and 5 1/8″
- Mark the center of the ends of each piece of wood. Then use a 1 1/2″ Forstner bit to cut out candle holders for tea lights.
- Use a clamping square to make sure the wood pieces are square, then trace a 4″ gingerbread man cookie cutter onto the wood.
- The gingerbread man is ready to be cut out.
I also made a stocking candle holder as well. You’ll see it in a bit.
Continue with These Steps
- So as to simplify cutting the rounded portions of the outline, I chose to drill these sections. Therefore, I cut out the hands using a 3/4″ Forstner bit. (bit sizes noted were chosen to match the outline of our gingerbread man – yours may differ)
- Use a 1″ Forstner bit for the legs and a 1 1/4″ bit for the head. The complete candle holder is shown clamped together here but is not yet glued together.
- & 4. Use the bandsaw to finish cutting the outline of the gingerbread man
Stain Did Not Work Well with New Wood
After cutting out the gingerbread man and the stocking and sanding the pieces, I stained the pieces and did not like the way they looked. (They are not glued together here.)
I then decided that it would be best to paint new wood, so I sanded off the stain and then glued the pieces together.

Paint and Glitter the Candle Holders
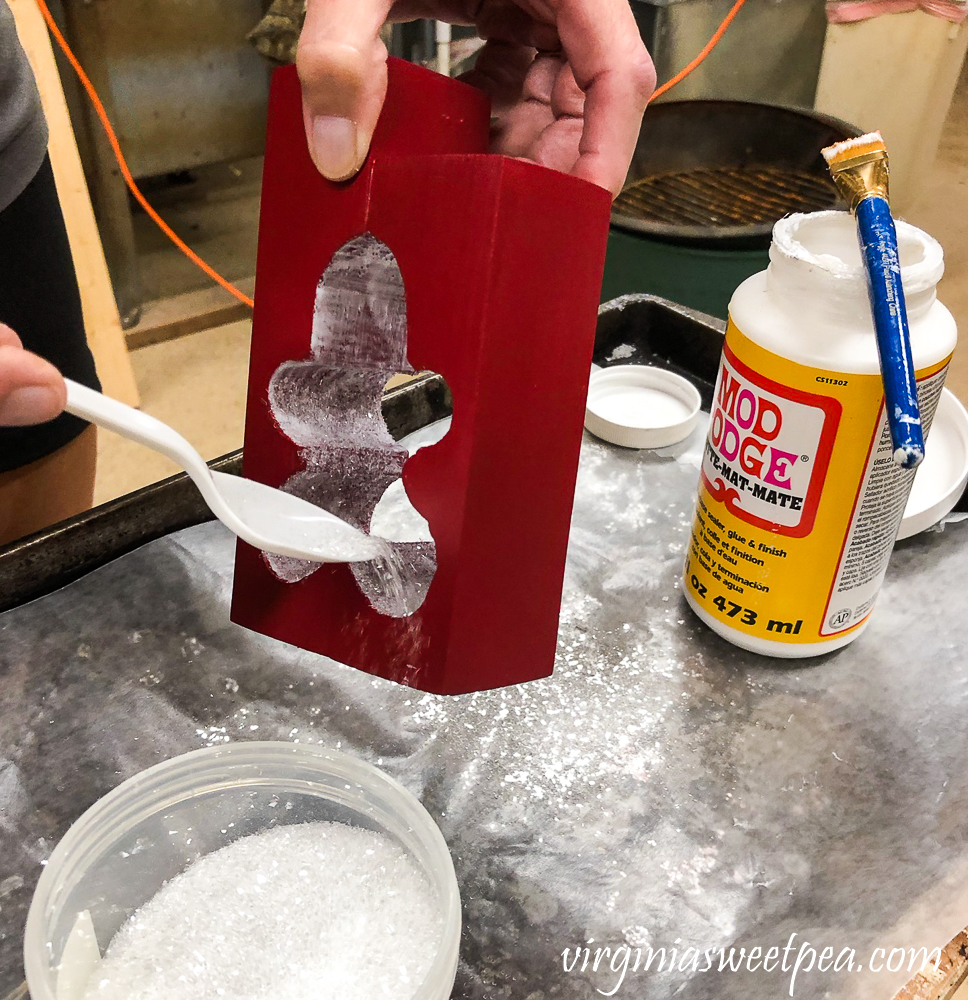
I painted the candle holders with two coats of red craft paint, then accented the cutouts with FloraCraft Diamond Dust. I love this product and prefer it over regular craft glitter.
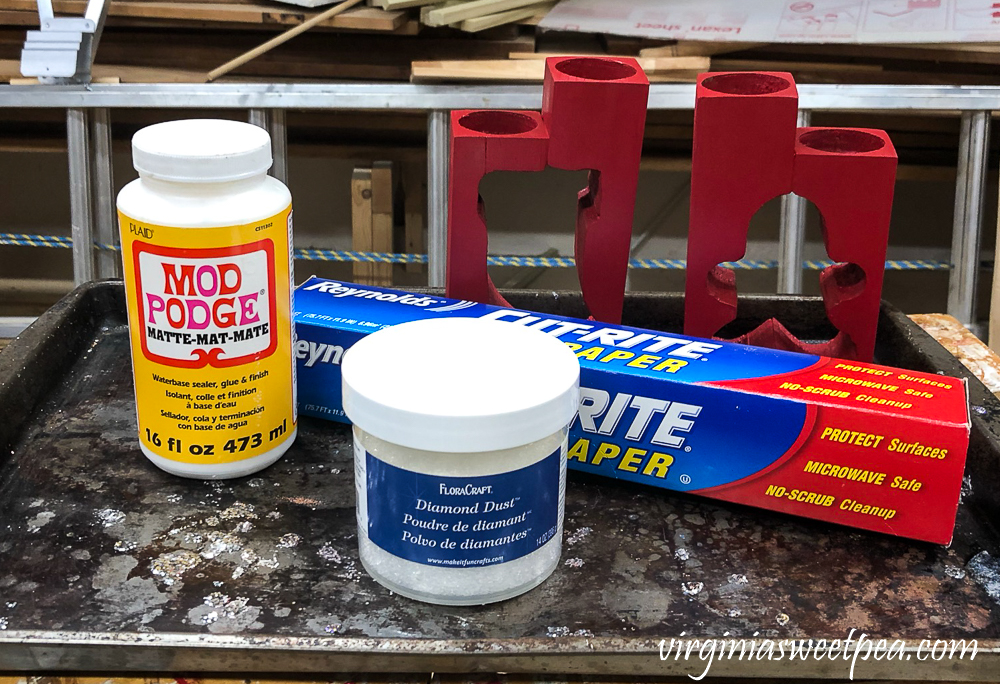
I keep an old cookie cutter in my craft cabinet to use for glitter projects. I always work over a sheet of waxed paper or parchment paper so that I can pour the unused Diamond Dust back into the container.
I used a craft paintbrush to brush a coat of Mod Podge onto the cut out sections. Then I used a plastic spoon to pour Diamond Dust onto the Mod Podge.
I loved how both the gingerbread man and the stocking candle holders turned out!
Snowman Candle Holder with New Wood
While I was making the gingerbread man and stocking candle holders, Mr. SP made a snowman version.

Follow these steps to make a snowman:
- The base of the snowman was cut using a 1 5/8″ Forstner bit.
- The first hole is complete. This is softer wood than the walnut, so it was easier to drill, but care must still be taken to drill slowly to prevent the bit from grabbing.
- The middle of the snowman was cut with a 1 1/4″ Forstner bit.
- The head was cut with a 1″ Forstner bit.
The snowman candle was then sanded and painted with two coats of white craft paint.
Mr. SP and I had so much fun making these candle holders. These candle holders would make a great gift and I have a feeling that we’ll be making a few more to give to special friends and family this Christmas season.
More Christmas DIY Projects to Enjoy
Now it’s time to enjoy the projects that the rest of the Thrifty Style Team is sharing today. Click on the links below to see each project.
Redhead Can Decorate – 25 Affordable Thrifty DIY Christmas Decorating Ideas
The Painted Hinge – Vintage 7UP Crate Christmas Centerpiece
DIY Beautify – How to Make a Glitter Ornament Nativity
2 Bees In A Pod – Stamped Book Stacks For Christmas
Postcards From The Ridge – Easy DIY Snowman Wreath
The How To Home – Copper Geometric Christmas Ornament
The Tattered Pew – Easy Homemade Christmas Soaps For Kids
Sweet Pea – How to Make Christmas Cut Out Wooden Candleholders
What Meegan Makes – Glittery Christmas Wreath From An Embroidery Hoop
Cottage At The Crossroads – Wooden Chinoiserie Christmas Ornament
I Should Be Mopping The Floor – How To Make Christmas Tassels
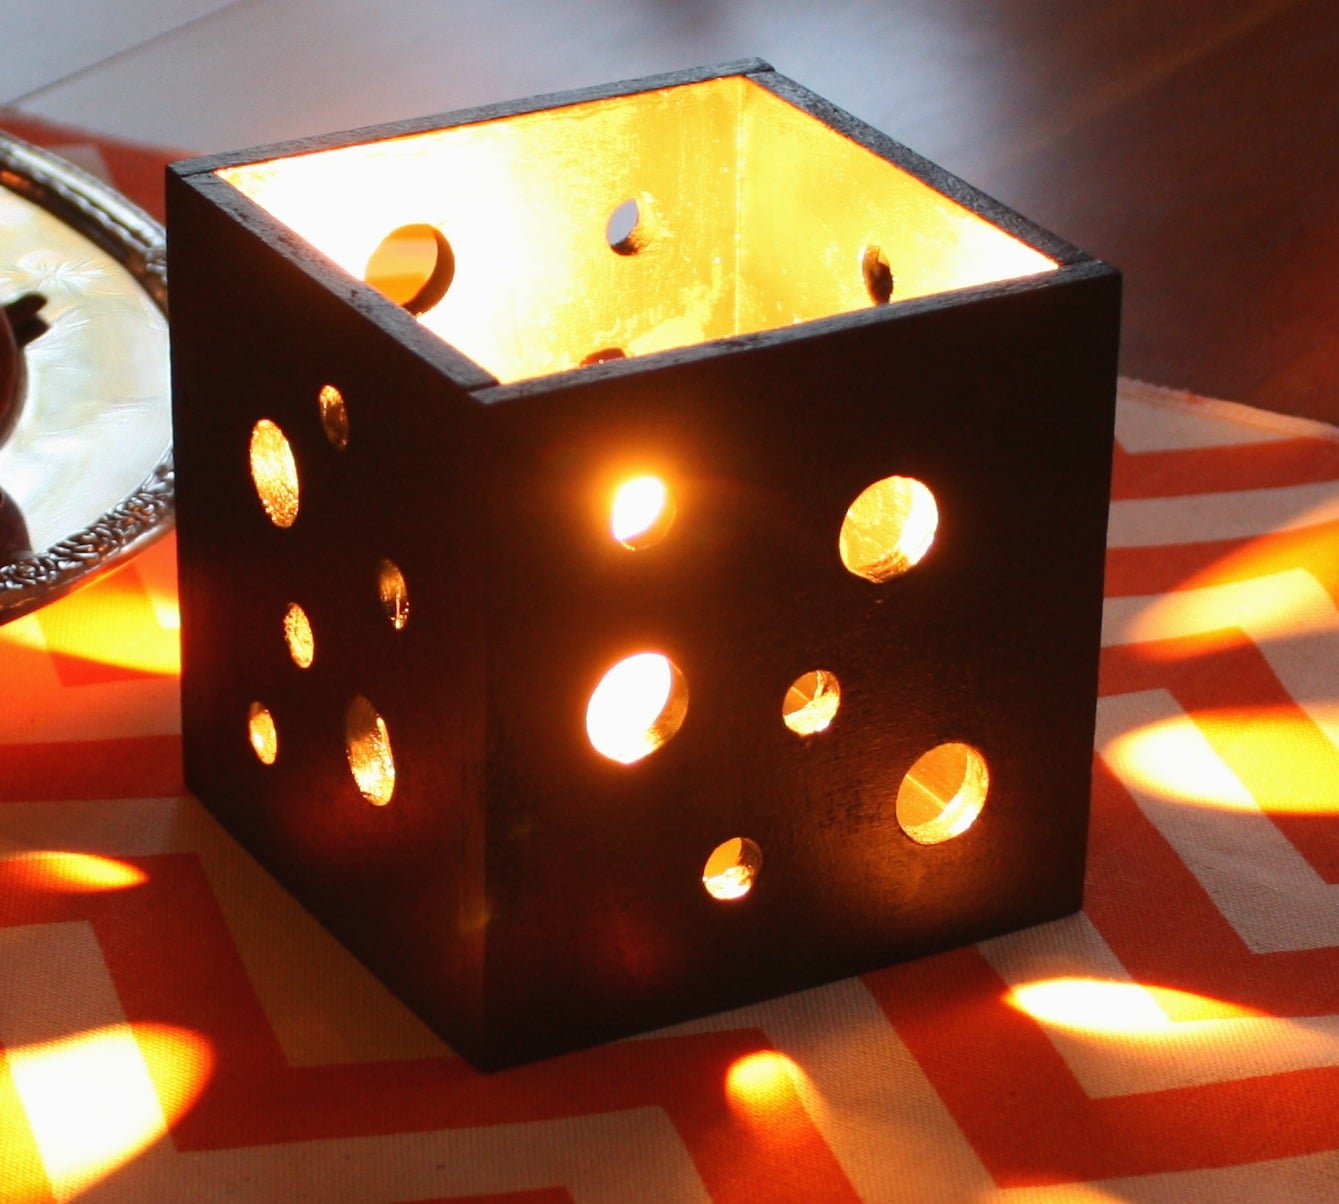
Lora B Create & Ponder – DIY Repurposed Candlesticks with Sheet Metal Shades
White Arrows Home – DIY No Sew Christmas Pillow


One of the best craft how-to’s ever!
Paula, they all came out so cute great idea .
The snowman is my favorite. I’m now thinking about my great-grandmother’s old table that broke. One leg broke in a way that could not be fixed. We saved the table top for a project but not the legs. DARN!
I absolutely love how these turned out. I can’t decide a favorite, but I love the sentiment behind the tree. These would make incredible gifts too!
Paula, I love them all!!!
Girl, you outdid yourself on this post! Talk about gorgeous… I love the snowman one too, because it looks like just a circle cutout… you could use that all year long! They are all amazing!
And, I’m excited to be featuring you at Tuesday Turn About tomorrow!
What a Hot project and best part is; they can be made and used for anytime of the year & not just for the holidays just by changing the cut-out or by not even having a cut-out.
Great project to use up the many pieces of scrap wood that hubby has stored in tubs.
Thank you for the step by step tutorials.
These are amazing Paula! I love the history you preserved by making something beautiful and functional! And a great project to do together ❤
Y’all are just having too much fun in that workshop! Such a unique project and anyone would appreciate the candle holders as a gift. Thanks for that tip about diamond dust. I didn’t even know it existed!
These are amazing, Paula. And your tutorials are so helpful that even I could make these, lol. That bandsaw is definitely a beast. I love Watco products and that walnut finish is so pretty.
These turned out so awesome! Love the walnut ones; even more special with the family connection. Great idea to use cookie cutters as templates. You and the Mr had some good shop bonding time:)
You and your husband are a creative powerhouse! These are seriously awesome, Paula!
These are incredible Paula! I would have never dreamed up something this creative. And I so admire your woodworking skills! Great job my friend!
Each and every candle stick is a work of art. Wow, just wow! From the snowman to the Christmas tree they are stunning and make a lovely gift.
Ok Paula now I want a bandsaw! These are just awesome! I love the furniture legs you used and the tree cutout is perfect!
Just to let you know I will pray for you to heal very soon.
Take care and a huge hug from Spain.
Charo
Paula, these all turned out absolutely adorable. But, I’m seriously loving the glitter and red on that gingerbread man candle…too cute! xoxo,kristi
This is such an amazing and beautiful idea!! You are so creative! I want to come to Camp Sweet Pea and take woodshop!! I’m also so glad you joined us for Welcome Home Sunday this week!!
Wowie!!! You are so talented with these wood crafts!!! You could sell these beautiful candles, Paula! I love how you & Lora were on the same wave length this month!! We should do a challenge one of these days. Gotta think on that after the holidays, lol. I hope you guys have a wonderful Thanksgiving xxoo
I loved each one and want to get on this! Featuring you on the Farmhouse Friday link party! Woo hoo! Pinned
This is such a great idea. I love the look! Thanks for sharing the tutorial. Have a great weekend Paula!
I’m not sure how I missed this post! Amazing!! Thanks for the inspiration!
We had so much fun making these! I have already given three of them to relatives. We may need to make some more as they make a great gift.
Paula
Paula, your workshop is fabulous! I cannot believe how easy you make this look, The candle holders are so sweet, I am sure that they would be a wonderful gift! You could place them in a basket with candles and diy decorated matchbooks(I made some last year and they were a big hit!)
Thank you so much, Elizabeth! Your gift basket idea is a good one!
This is such a fun idea! And upcycling table legs? That is pure genius! My favorites are the Christmas tree and the gingerbread man.
Thank you so much, Stacey! Those two went to my mom and my niece.
Omgoodness, I have a workshop filled with legs like the ones you have! Now I just need to pull out my cookie cutters! Great project Paula! Pinned 😊
Thank you so much, Cindy!